Saturday, September 24, 2011
Dziobas Rar Player
Dziobas Rar Player
Fungsi Program Ini, Bisa Play Satu Part Aja Dari Beberapa Part Film Yang Kita Download
Jadi Seandainya Ada 10 Part File Rar, Kita Download Aja Dulu Satu Part, Abis Itu Play Pake Aplikasi Ini
Berikut Sedikit Tutorial Cara Pakenya, Contoh Di Sini Gw Download 1 Part Dari TV Shows CSI Season 11
 Langkah Berikutnya, Buka Aplikasinya, Trus Klik Seperti Pada Gambar
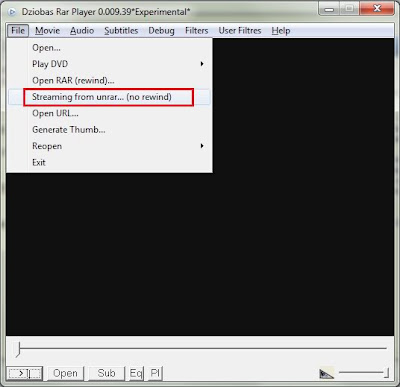 Setelah Klik Seperti Pada Gambar Atas, Pilih Part 1 Dari File Rar Yang Udah Di Donlod
Ntar Muncul Dialog Seperti Gambar Dibawah, Nanyain Password Dari Rar File
Kalo Emang Ga Ada Password Rarnya, Ya Kosongin Aja Passwordnya
Kalo Emang Ada Passwordnya, Masukin Deh Passwordnya
Nah Kalo Udah, Ntar Play Dah Filmnya, Walau Kita Cuman Donlod Satu Part Aja
Cuman Ya Ga Sampe Abis Lah Playnya
Tapi Setidaknya Bisa Ngecek Kualitas Videonya Tanpa Harus Donlod Semua Part
Kalo Gw Selalu Donlod Dari Part Terahir Aja, Biasanya Paling Kecil
Buat Yang Mau Coba Bisa Donlod Di Sini http://dziobas-rar-player.en.softonic.com/
Wednesday, September 21, 2011
Cara Membuat file ISO dengan Alcohol 120%
1. Install Alcohol 120% di atas
2. Masukkan CD ke dalam drive dan jalankan program alcohol.
3. Pilih menu Image making wizard
4. Lalu set CD/DVD device sesuai yang digunakan, kecepatan sesuaikan dengan kebutuhan. Dengan kecepatan maksimum akan mengurangi waktu, sedangkan dengan kecepatan biasa kemungkinan gagal akan lebih kecil (jika anda tidak yakin bahwa CD dalam keadaan baik) namun mengurangi beban CD ROM Drive.
5. Pilih direktori, nama, dan jenis ekstensi file akan ditempatkan.
6. Tunggu sampai proses selesai…
Saturday, September 3, 2011
Menambahkan Subtitle Pada Video.AVI
1. Convert SRT ke SSA dengan SRT to SSA Converter
2. open VirtualDub.. virtual dub memerlukan codec tambahan yaitu XVID
3. Open Video File.avi
4. Open Video, Filters, Add, Load, Open subtitler.vdf dan browse .ssa dr nomor 1 di atas
5. Open Video, Compression, pilih XVid atau DivX.. kalo tdk dicompress filenya sgt gede
6. Click File, save as avi dgn nama baru
Sunday, August 28, 2011
Rekam Ketikan Menjadi Animasi Format .gif
Sekedar tips ringan, mengenai webtool yang menyediakan fitur unik, yaitu dapat merekam kegiatan typing (mengetik) yang selanjutnya akan menjadi sebuah gambar animasi persis seperti dari awal kita mengetik, bahkan juga akan merekam kesalahan yang kita perbaiki. Selanjutnya gambar berformat .gif tersebut dapat kita posting ke blog ataupun forum yang kita inginkan, sederhana saja, cukup mengetik pada kotak yang tersedia – typing is recording. pilih type font sesuai keinginan dan klik pada tombol ENLIVEN untuk mengakhiri merekam.
Silahkan menuju linknya : http://livetyping.com/
Silahkan menuju linknya : http://livetyping.com/
Monday, August 22, 2011
Problem Pointer Mouse Yg bergerak2 Sendiri
Mouse Jiggler is a very simple piece of software whose sole function is to "fake" mouse input to Windows, and jiggle the mouse pointer back and forth.
Useful for avoiding screensavers or other things triggered by idle detection that, for whatever reason, you can't turn off any other way; or as a quick way to stop a screensaver activating during an installation or when monitoring a long operation without actually having to muck about with the screensaver settings.
Requires .NET Framework 2.0
http://mousejiggler.codeplex.com/
Friday, August 12, 2011
Problem Mouse Yang Sering Dobel Klik
Agan pernah punya mouse optik (merk apa saja) yg kadang dlm beberapa bulan sdh error dgn sering dobel klik padahal agan cuma klik-nya skali saja? Problem ini biasanya sangat mengganggu klo lagi sementara browsing atw yg suka mengedit di kompie-nya...
Klo ya, berarti tool ini bisa membantu agan2 memecahkan masalahnya...
MouseFix
Mousefix adalah aplikasi mini yg bisa agan taroh di folder startup klo agan misalnya punya problem seperti diatas. MouseFix bisa memonitor klik mouse agan supaya tdk 'salah' ketika meng-klik. Source code-nya jg disertakan gratis.
Biarpun tool ini dikhususkan buwat tipe mouse 'Microsoft Intellimouse Explorer Optical Mouse', ane sdh coba & berhasil untuk semua mouse ane yg error kyk gini. Daripada dibuang, kan sayang...
1. Download MouseFix http://www.mediafire.com/?2l051yxvjwdvngr
2. Ekstrak terus taruh di C:\Program Files\MouseFix.
3. Bikin shortcut MouseFix.exe trus taruh di folder "Startup" Start menu.
4. Done!!
Setting Speedy dengan modem TP-LINK TD-W8901G
Selesai dengan modem, saatnya konfigurasi modem untuk speedy. Disini modem disetting agar begitu dinyalakan maka akan langsung terhubung dengan internet.
1. akses http://192.168.1.1 melaui web browser
2. masukkan username dan password : admin
3. masuk menu Quick Start dan tekan tombol RUN WIZARD, maka akan muncul jendela baru
4. pilih Time Zone, NEXT
5. pilih opsi PPPoE/PPPoA agar modem dapat langsung terhubung ke internet begitu dinayalakan, sehingga tidak perlu melakukan dial dari komputer, NEXT
6. masukkan username dan password speedy. VPI :8, VCI :81, Connection Type : PPPoE LLC, NEXT
7. jika akan menggunakan Wireless LAN (Wlan), aktifkan Access Point,
kemudian set :
> SSID :wireless-name (disesuaikan)
> Broadcast SSID :Yes
> Authentication type :WPA2-PSK
> Encription :TKIP
> Pre-Shared Key :password-wireless (disesuaikan)
> NEXT
Setelah konfigurasi tersimpan, matikan modem beberapa saat kemudian nyalakan kembali. Cek apakah semua lampu indikator bekerja dan koneksinya sudah berjalan.
Tuesday, August 9, 2011
Koleksi Situs Leecher
Apa Itu Leech?
Leech merupakan semacam aplikasi script php yang digunakan untuk melakukan bypass dari file hosting / server hosting (semacam rapid*share, dll) ke hosting atau server lain yang kita gunakan dimana sudah tersimpe script leech didalamnya. Selain itu, Leech telah dipasang dengan banyak Plugin, sehingga mampu mentransload file2 dr banyak filehosting seperti rapid*share, Megaupload, Hotfile, fileserve, filesonic, wupload dll
Prinsip kerja leech
prinsip kerja leech adalah untuk bypasing atau lebih tepatnya memindahkan dulu file dari filehosting ke server / web hosting yang sudah dipasangi script leech, sehingga kita bisa mendownload file dari file hosting tanpa menggunakan account premium,
pada saat kita meng-transload (istilah untuk script leech, semacam perintah untuk mengambil file sesuai dengan link yang kita masukkan). file tersebut akan diambil oleh hosting / server untuk kemudian disimpan didalam server atau hosting yang sudah ditanamkan script leecher, untuk kemudian baru kita mendownload dari server / hosting leech kedalam pc kita tanpa premium account.
Kelebihan memakai leecher :
1. download jadi lebih cepat
2. bisa di pause n resume
Koleksi situs leecher ane
1.http://rapid8.com/
2.http://megavideodownloader.com/
3.http://www.superleech.com/
4.http://www.hlusoe.info/
5.http://myfreeleech.com/
6.http://www.oneleech.com/
7.http://www.megahotserved.com/
8.http://dgratis.net/
9.http://megaleech.us/
10.http://www.petaleech.us/
11.http://leechfree.com/
12.http://leechfast.us/
13.http://freerapidleech.net
14.http://onleech.net/ (ngak ada limitnya tuh)
15.http://acatalapapa.co.cc/index.php ...kenceng
16.http://cepat.us
No. 1 & 2 paling mantap gan, bisa diresume kapan aja, ga expired filenya
[Direct.Link.Generator] Mediafire - Hotfile - Enterupload
http://generator.indofiles.us/
Download Video from Tudou
Unplug https://addons.mozilla.org/firefox/2254/
First you go to the video website you wanted to download, then press the button Unplug. After that it will take you to a site with the download link, then you can copy the link and put it to your download manager.
==================================
In order to download Tuduo online videos, all you need to do is to enter the respective URL for Tuduo video into this site http://www.kisstudou.com/
Step 1 : Enter the URL for Tuduo online video into the text box, enter
Step 2 : Right click at the new video link and save as .flv file format
Video downloaded will be in FLV file format. You can view FLV videos using Adobe Media Player or GOM Player
Monday, August 8, 2011
Thursday, August 4, 2011
bikin avatar
1. buka web ini >> KLIK
2. pilih gambar yg diinginkan, dengan cara klik pada gambar tersebut
3. pilih "Resolution" ke 128x128
4. pada kolom "Enter Text" silahkan tulis ID anda atau terserah anda.
5. jika sudah klik kanan pada gambar utk save hasil gambar ke komputer
6. buka Ulead GIF animator, klo gk punya nih link Downloadnya > KLIK *avatar ane jg bikin pake ini lho gan
7. pada menu Ulead GIF klik "file" > "open file" lalu cari lokasi gambar tempat ente nyimpen hasilnya yg di dapet dari link tsb diatas.
8. jika sudah klik "edit" > "canvas size"
9. klik/centang "keep aspect ratio" lalu isikan 100 pada "width"nya lalu klik "OK" (ini jg berguna utk menghilangkan watermarknya gan, jadi kepotong)
10. selesai sudah klik "file" > "save as" > "GIF file"
11. jika sizenya kelebihan(besar), buka kembali hasil tadi di Ulead GIF lalu klik "file" > "optimation wizard" dan klik/centang pada "optimize using a preset" lalu pilih optimize yg mana saja yg bisa sampai meminimalkan size gambar(dibawah 39kb soalnya standard kaskus segitu gan)
12. jika sudah lakukan hal pada nmr 10. lg gan utk menyimpan kembali gambar yg sudah di resize tadi utk di uplaod mjd avatar utk di kaskus
Monday, August 1, 2011
How to run separate Firefox Profiles
How to run separate Firefox Profiles
How to run separate Firefox Profiles (Run different copies, not new
windows, of firefox on the same computer)
This is NEEDED to run multiple MWAP characters, at the same time, on
the same computer, and same user.
Using this, I have 6 MWAP characters playing 24/7.
1. Copy these instructions to notepad. (Or whatever text editor you
want)
2. Shutdown firefox, X out, firefox CANNOT be running for this.
3. Press and hold the Windows Key and hit R (Win+R) to open the run
menu.
4. Paste this in...
"F:\Program Files\Mozilla Firefox\firefox.exe" -profilemanager
5. Click 'OK'
Now the profile manager will pop up...
As you can see, I've already created another profile.
6. Click 'Create'
7. Click 'Next'
8. Type in what you want to call the profile (I.E. Mafia1)
9. Click 'Finish'
10. Make sure 'Don't Ask at Startup' is CHECKED like in my picture.
11. Click 'Exit'
Now you've made the new profile, But oh noes! How to get to it?!
12. Create a new shortcut on your desktop for firefox, You can do this
easily
by right clicking your current shortcut, and clicking copy, then right
clicking
elsewhere and clicking paste.
13. Right click your new firefox shortcut.
14. Click 'properties'
15. In the TARGET box, Add the following to the END
-P mafia1 -no-remote
Change mafia1 to whatever you named the new profile to!!!
So, In my case, my FULL link will look like this...
"F:\Program Files\Mozilla Firefox\firefox.exe" -P FF2 -no-remote
16. Click 'Ok'
17. Right click the shortcut, rename it to whatever you choose, I
renamed mine 'Mafia1'
18. Enjoy!
Test it out, dbl click that shortcut, and it'll open up what looks like
a new installation
of firefox. This is the NEW profile, You can be on a seperate facebook
account now with no
issues. Run a seperate copy of firefox at the same time as your main,
and run two Mafia Wars
accounts at once. Or 10, or 50, depending on how sexy your computer is.
Since this is a new profile, you have to reinstall everything,
greasemonkey, MWAP, any addons/themes
you might need/want.
Singkatan2 Chat/Forum
IDK: i don't know
IMO:in my opinion
IMHO: in my humble/honest opinion
FYI: for your information
CMIIW: correct me if i'am wrong
FYEO : for your eyes only
BRB: Be Right Back
OOT: Out Of Topic
Japri: Jalur Pribadi
Milis: Mailing List
Fwd: Forward
ASAP: As Soon As Possible
AFAIK: as far as i know
CMI : Count Me In
CMO : Count Me Out
THX: thanks
FWIW: for what it's worth
TIA: thanks in advance
BTW: by the way
GTG: Got to Go
WB: Welcome Back
LoL: Laughing Out Loud
ROFL: Rolling On the Floor Laughing
ASL: Age, Sex, Location
OIC: Oh I See
HTH: Hope This Help
OOP: Out Of Print
2: to
b: be
AKA: as known as
ATM: at the moment
B4: before
CFV: call for votes
FYA=For Your Attention
GA: go ahead
HHOJ: ha ha only joking
HHOK: ha ha only kidding
HHOS: ha ha only serious
IAE: in any event
IYKWIM: if you know what i mean
JK: just kidding
L8R: later
OTOH: on the other hand
OTTH: on the third hand
RFC: request for comment
RFD: request for discussion
RSN: real soon now
WRT: With regard/respect to
WYSIWYG: what you see is what you get
YMMV: your mileage may vary
YMMVG: your mileage may vary greatly
My Recent Documents
Cara Menghapus data di "My Recent Documents" dan menonaktifkannya
1. Klik kanan di start menu, properties
2. di tab start menu, customize
3. di tab advance di bagian recent documents klik clear list utk menghapus dan hilangkan conteng List my most recently opened documents, klik ok
1. Klik kanan di start menu, properties
2. di tab start menu, customize
3. di tab advance di bagian recent documents klik clear list utk menghapus dan hilangkan conteng List my most recently opened documents, klik ok
mlRC
Ingat, mohon dilakukan/diketikkan "SEMUANYA" didalam Status Window, "BUKAN" di chat window karena beresiko besar !
Tips: Jika semua ini diketikkan manual memakai jari akan agak lambat, saran saya simpan perintah2 ini terutama untuk validasi ke file notepad atau word yang kapan saja bisa dicopy dan di paste ke dalam status window
1. Registrasi Nick
Ini adalah langkah pertama untuk mendaftarkan nick anda yang sedang anda pakai, bukan yang "akan" anda pakai.
Code:
/msg nickServ@services.dal.net register
Contoh :
Code:
/msg nickServ@services.dal.net register sandikunciku blin@yahoo.com
Perhatian !
Semua yang diketikkan tidak masalah didalam huruf besar atau kecil, KECUALI PASSWORD, jadi hati2 didalam menentukan password ! Nick zabrik atau ZABRIK dianggap sama.
INGAT ! Nick ini belum menjadi milik anda sebelum anda aktivasi (langkah berikutnya), dan jika didalam 72 jam tidak diaktivasi, maka registrasi nick ini menjadi sia-sia.
2. Aktivasi Nick Yang Baru Diregister
Jika anda melewati langkah ini, NICK anda belum milik anda !
Tunggu sampai ada email dari pengirim bernama DALnet Registration Services di email yang anda pakai untuk registrasi diatas. Kadang2 bisa cepat (5-15 menit), kadang bisa beberapa jam.
Ada dua cara untuk aktivasi, pilih salah satu saja, yakni :
Copy dan paste yang mirip ini /msg NickServ@services.dal.net AUTH Blin R8347204903984934 kedalam Status Window.
atau
Click saja link yang mirip -> http://users.dal.net/cgi-bin/auth.cg...47204903984934 dan browser akan menuju suatu web site.
Selesai dan selamat ! Nick ini sudah resmi menjadi milik anda akan tetapi jika anda tidak pernah memakainya lebih dari 30 hari, maka kepemilikan anda hilang.
3. Validasi / Otorisasi Nick And Dengan Password
Ini yang paling sering anda lakukan setiap kali anda connect ke jaringan pertama kali. Ingat siapkan copy & paste supaya cepat !
Code:
/msg nickServ@services.dal.net identify
Contoh :
Code:
/msg nickServ@services.dal.net identify passwordku
Jangan lupa di-Enter tentunya.
Ingat ! Semuanya tidak perduli huruf besar atau kecil kecuali password, jadi jika password anda ada campuran huruf besar dan kecil, pastikan seperti itu juga.
4. Nick Yang Menggantung / Tersangkut
Jika anda mengalami disconnect dan nick anda menggantung sehingga tidak bisa memakainya, pakai command ini untuk menghilangkan nick sangkut tersebut.
Code:
/msg nickServ@services.dal.net ghost
Contoh :
Code:
/msg nickServ@services.dal.net ghost Blin passwordku
Setelah selesai, maka nick anda yang tersangkut akan hilang dan anda bisa merubah kembali ke nick asli.
Pakai command "/nick", tentunya jangan lupa langkah no.3 diatas karena tetap akan dimintakan otorisasi setelah anda merubah ke nick asli.
Catatan:
Saya sarankan jangan di-utak-atik biar ngga masalah terutama ngga ngerti atau cuma mau coba2, buat yang "benar2" penasaran dan ingin tahu mengenai command2 ini lebih lanjut, coba saja ->
Code:
/msg nickServ@services.dal.net help
Dilayar status window akan keluar panduan perintah2 lainnya.
5. Ganti Nick Sewaktu Online
Pada saat2 tertentu jika anda perlu mengganti nick anda ketikkan seperti dibawah ini di chat window atau status window (sama saja) sbb :
/nick
Tips: Jika semua ini diketikkan manual memakai jari akan agak lambat, saran saya simpan perintah2 ini terutama untuk validasi ke file notepad atau word yang kapan saja bisa dicopy dan di paste ke dalam status window
1. Registrasi Nick
Ini adalah langkah pertama untuk mendaftarkan nick anda yang sedang anda pakai, bukan yang "akan" anda pakai.
Code:
/msg nickServ@services.dal.net register
Contoh :
Code:
/msg nickServ@services.dal.net register sandikunciku blin@yahoo.com
Perhatian !
Semua yang diketikkan tidak masalah didalam huruf besar atau kecil, KECUALI PASSWORD, jadi hati2 didalam menentukan password ! Nick zabrik atau ZABRIK dianggap sama.
INGAT ! Nick ini belum menjadi milik anda sebelum anda aktivasi (langkah berikutnya), dan jika didalam 72 jam tidak diaktivasi, maka registrasi nick ini menjadi sia-sia.
2. Aktivasi Nick Yang Baru Diregister
Jika anda melewati langkah ini, NICK anda belum milik anda !
Tunggu sampai ada email dari pengirim bernama DALnet Registration Services
Ada dua cara untuk aktivasi, pilih salah satu saja, yakni :
Copy dan paste yang mirip ini /msg NickServ@services.dal.net AUTH Blin R8347204903984934 kedalam Status Window.
atau
Click saja link yang mirip -> http://users.dal.net/cgi-bin/auth.cg...47204903984934 dan browser akan menuju suatu web site.
Selesai dan selamat ! Nick ini sudah resmi menjadi milik anda akan tetapi jika anda tidak pernah memakainya lebih dari 30 hari, maka kepemilikan anda hilang.
3. Validasi / Otorisasi Nick And Dengan Password
Ini yang paling sering anda lakukan setiap kali anda connect ke jaringan pertama kali. Ingat siapkan copy & paste supaya cepat !
Code:
/msg nickServ@services.dal.net identify
Contoh :
Code:
/msg nickServ@services.dal.net identify passwordku
Jangan lupa di-Enter tentunya.
Ingat ! Semuanya tidak perduli huruf besar atau kecil kecuali password, jadi jika password anda ada campuran huruf besar dan kecil, pastikan seperti itu juga.
4. Nick Yang Menggantung / Tersangkut
Jika anda mengalami disconnect dan nick anda menggantung sehingga tidak bisa memakainya, pakai command ini untuk menghilangkan nick sangkut tersebut.
Code:
/msg nickServ@services.dal.net ghost
Contoh :
Code:
/msg nickServ@services.dal.net ghost Blin passwordku
Setelah selesai, maka nick anda yang tersangkut akan hilang dan anda bisa merubah kembali ke nick asli.
Pakai command "/nick
Catatan:
Saya sarankan jangan di-utak-atik biar ngga masalah terutama ngga ngerti atau cuma mau coba2, buat yang "benar2" penasaran dan ingin tahu mengenai command2 ini lebih lanjut, coba saja ->
Code:
/msg nickServ@services.dal.net help
Dilayar status window akan keluar panduan perintah2 lainnya.
5. Ganti Nick Sewaktu Online
Pada saat2 tertentu jika anda perlu mengganti nick anda ketikkan seperti dibawah ini di chat window atau status window (sama saja) sbb :
/nick
Membuat Firefox Sebagai Default di YM
Windows Tips: Cara Membuat Yahoo Messenger Gunakan Firefox sebagai browser default!
* di windows Klik menu Start
* Klik All Program
* Klik “Set program access and computer defaults”
* Pilih Custom, kemudian klik drop arrow
* Cari "Pilih default browser" lalu pilih Mozilla Firefox sebagai browser default
* di windows Klik menu Start
* Klik All Program
* Klik “Set program access and computer defaults”
* Pilih Custom, kemudian klik drop arrow
* Cari "Pilih default browser" lalu pilih Mozilla Firefox sebagai browser default
Trik Mengambil Text Dari Website Yang Diproteksi
Pernah enggak temen-temen ingin menyalin (tepatnya mengambil) Gambar / Text dari suatu website ?
Tentu seringkan,....
Bukanlah hal yang sulit -jika- website tersebut TIDAK diproteksi....
Namun ketika teman-teman terbentur oleh website yang DIPROTEKSI, bagaimana cara mengambil Gambar / Text nya ?
Kalau cuma untuk mengambil Gambar dari website yang diproteksi, kita bisa mengakalinya dengan menggunakan program semacam Screen Capture atau Picture Capture, tentu tidak sulit melakukannya. (Penulis tidak membahas teknik pengambilan gambar ini)
Masalahnya, bagaimana caranya kita meng-copy Text (misalnya untuk di-paste ke Word) dari website yang diproteksi oleh Sang Webmasternya, seperti:
1.Tombol klik kanan di-disable (Tidak aktif)
2.Tidak bisa mem-block Text.
Masih untung kalau temen-temen masuk ke kode HTMLnya dan bisa menemukan Text yang diinginkan, namun bagaimana kalau Text-pun yang dicari tidak diketemukan alias di-ENCRYPT ??
Untuk lebih jelasnya, Teman-teman harus COBA sendiri supaya MENGERTI.
Masuklah ke website www.17tahun.com dengan menggunakan browser, selanjutnya pilihlah Text / Cerita yang ingin di-salin ke Word.
Kemudian block-lah Text cerita yang di-inginkan, atau tekan tombol klik kanan pada mouse, gimana hasilnya ?
Atau masuklah ke kode HTML-nya, cobalah cari “Text Cerita”-nya, DIJAMIN TIDAK AKAN KETEMU, ( Silahkan DIPRAKTEKAN dulu supaya Percaya !!)
Pakai browser Opera ? Hasilnya akan sama saja dengan browser Internet Explorer.
Boro-boro mengedit pakai Word atau FrontPage, tidak akan bisa, Silahkan coba !
Bahkan menggunakan program “Web to Word/Text”– pun akan gagal.
Pasti TIDAK Berhasil, Ya Iyalah, karena di-ENCRYPT menggunakan JavaSript !!
Namun, dilain pihak, mungkin diantara temen-temen memang ada yang benar-benar sangat membutuhkan Text tersebut. Tentu tidak bijaksana dan akan menghabiskan waktu serta tenaga jikalau temen-temen membaca satu persatu Text yang ada diwebsite tersebut dan kemudian baru diketik ke Word.
Berangkat dari hal ini Penulis mencoba mencari jalan yang LEBIH MUDAH dan EFISIEN, Ada enggak sih caranya ?
Jawabnya : A D A
--Sebelumnya Penulis mohon maaf kepada www.17tahun.com karena belum minta ijin untuk menggunakan website tersebut sebagai contoh praktek ujicoba. --
www.17tahun.com adalah contoh website yang bagus, karena melindungi hasil karya orang lain, dan memang sengaja mempersulit proses pembajakan / menyalinnya.
Dalam memproteksi website, Sang Webmasternya melakukan:
1.Tidak bisa mem-blocking Text,
2. Fungsi klik kanan TIDAK diaktifkan,
3.Textnya di-ENCRYPT dengan JavaScript,
4.Bahkan menggunakan Frame pula.
Namun seperti kata Pepatah, tiada gading yang tak retak,...
Inilah solusinya mengakalinya…
Software yang Penulis gunakan:
“Windows XP”, “Internet Explorer”, "Microsoft Word", "Adobe Reader 7", "Easy PDF Creator".
Langkah 1:
Pertama-tama Install dahulu program “Easy PDF Creator” yang bisa di-download dari www.pdfdesk.com
Setelah program “Easy PDF Creator” selesai terinstall, otomatis akan ada tambahan Icon di bagian “Print”.
Sebelum melanjutkan ke langkah 2, buatlah folder khusus untuk ujicoba kali ini dengan nama folder “17tahun”.
Langkah 2:
Pada ujicoba kali ini, Penulis memilih cerita: Daun Muda == >> “keperawanan ani”, Penulis melakukan download pada webpage yang menjadi target, dengan perintah: “file ==> save as :”
Simpan file Webpage ini di folder “17tahun”
dan berikan nama webpage tersebut: “keperawanan ani”, lalu tekan tombol “save”.
Langkah 3:
Setelah proses penyimpanan selesai, masuklah ke folder tempat file webpage “keperawanan ani” disimpan.
Disana ada 1 nama “keperawanan ani.html“ dengan ukuran 2kb dan 1 folder “keperawanan ani_files” dengan ukuran sekitar 85 kb.
Langkah 4:
Double klik pada file “keperawanan ani.html” hingga webpagenya selesai diload oleh browser.
Kemudian dari menu browser lakukan perintah: “file ==> print”
Langkah 5:
Disini akan ditemukan beberapa menu pilihan untuk melakukan “print”, kliklah pilihan pada Icon "Easy PDF Creator" yang sudah temen-temen instal pertama-tama tadi (Lihat langkah 1).
Langkah 6:
Setelah menu PRINT dari “Easy PDF Creator” muncul, Kliklah tab “Optional” dan berikan centang pada pilihan “All Stand Alone”.
Langkah 7:
Masih dari menu PRINT “Easy PDF Creator” ini, lanjutkan dengan meng-klik “Preference”, kemudian klik pada tab “Page SetUp”, disana akan ada menu pilihan “Define Papersize”. Ubahlah ukurannya dari A4 menjadi A3.
Untuk ujicoba kali ini, Penulis memilihlah ukuran “A3”, karena bila yang dipilih ukuran A4, TEXT-nya akan melampaui batas tepian atau menabrak garis kertas (Coba ukuran lainnya untuk Situs yang lain).
Langkah 8:
Kemudian klik OK untuk menyimpan hasil settingan, dan lanjutkan dengan meng-klik tombol “Print” .
Langkah 9:
Masih dari menu yang sama, program akan otomatis melakukan penyimpanan file untuk webpage yang menjadi target tersebut, Jangan lupa pilih folder “17tahun” sebagai tempat penyimpanan filenya.
Isikan dengan nama : ”keperawanan ani-1”, lalu tekan tombol “Save”.
Setelah beberapa saat akan muncul kembali menu “save as”, isikan lagi dengan nama: “keperawanan ani-2”, lalu tekan tombol “Save” lagi.
Langkah 10:
Tunggulah dengan sabar sekitar 10-30 detik hingga proses Convert selesai.
Setelah berhasil, bukalah folder “17tahun”, disana akan ada file hasil Convert dari program "Easy PDF Creator" tadi, yang disimpan dalam format ber-extention PDF.
Di folder tersebut akan ada 2 file PDF yaitu :
“keperawanan ani-1.pdf” dengan ukuran 5 kb dan “keperawanan ani-2.pdf” dengan ukuran 188 kb
Langkah 11:
Lanjutkan dengan mendoble-klik pada file “keperawanan ani-2.pdf” yang berukuran 188 kb, maka file “keperawanan ani-2.pdf” akan di buka oleh Adobe Reader 7,
Jika semua langkah 1-10 sudah dilakukan dengan benar, maka pada Adobe reader 7, akan nampak Webpage dari cerita halaman “keperawanan ani” – dalam bentuk format PDF.
Langkah 12:
Jika Webpage-nya menabrak batas tepian atau tulisannya terpotong garis, cobalah dengan mengganti ukuran menjadi A2 atau ukuran lainnya yang lebih besar (Cara penggantian ukurannya, lihat kembali pada langkah 7).
Selanjutnya lihat pada Toolbar di Adobe Reader 7, akan ada pilihan 3 Icon bergambar: “sarung tangan” (Hand tools), “garis & kepala panah” (select tool), serta “kamera” (snapshoot tool).
Langkah 13:
Kliklah pada Icon “Garis & Kepala panah” (select tool), kemudian block-lah Text yang temen-temen ingin salin ke Word (Perhatikan tanda kecil Segitiga Biru).
Klik kanan tepat pada Text yang telah diblok tersebut, lalu pada menu pilihan yang muncul, pilihlah “Copy to Clipboard”
Langlah 14:
Lanjutkan dengan membuka Word, dan klik kanan pada blank document di Word, lalu pilih paste (salin).
dan hop.......
Text yang temen-temen pilih tadi sudah berhasil di salin ke Word.
Silahkan coba untuk Text / Cerita lainnya,
Mudah bukan…
Trik ini sudah bisa Penulis pratekkan juga di beberapa WEBSITE LAIN yang Proteksinya cukup ketat, dan berhasil.
Demikianlah Tutorial: Trik mengambil TEXT dari website Yang diproteksi.
Mohom MAAF yang sebesar-besarnya jika ada tulisan yang kurang mengena ataupun ada salah-salah kata.
Sunday, July 31, 2011
Hapus Bandwidth Reserved Windows
KHUSUS WINDOWS XP(klo win 7 ato vista, coba aja, ok) Hapus bandwidth
reserved windows untuk meningkatkan kecepatan Internet..
Spoiler for Begini caranya gan:
Langkah - langkah:
1. Klik Start - Run kemudian ketik gpedit.msc
2. Secara default anda akan dihadapkan pada group policy editor
3. Kemudian masuk ke Local Computer Policy
4. Computer Configuration lalu pilih Administrative Templates - Network
- QOS Packet Scheduler - Limit Reservable Bandwidth
5. Pada limit reservable bandwidth klik 2 kali dan pilih enable, dan
pada Bandwidth Limit % masukan angka 0 ( Kosong).
6. Close gpedit dan restart komputer anda. Selesai.. !!
Monday, July 25, 2011
Easy Way To Leach RapidShare Link
Bagi gua, dan mungkin banyak para download freak, selalu ogah-ogahan buat donlot file dari rapidshare, apa lagi kalo filenya segede gajah, males banget. Udah donlot ratenya kecil banget, bencana putus ditengah jalan kerap terjadi, yg memperparah bencana tadi, gak bisa diresume pula. beeh, jadi males donlot file dari rapid.
Biar males, tapi sebenernya niat dari dalam ati gede banget buat nyari cara donlot file dari link rapidshare, coz banyak banget file bagus yg diupload dirapidshare. Gua mulai dari nyoba-nyoba ngeleech pake situs-situs rapidleech yg bertebaran. Tapi kadang ngeselin juga ngeleech pake situs-situs leecher, rada susah, selama ini sih yg rada gak ribet tuh pake rapid8 ,
but, baru-baru nie gua punya alternatif laen buat ngeleech link dari rapid. Hanya saja nie bukan semacam situs leecher gitu, tapi web server upload file yg punya tambahan fitur buat ngeleech url dari RapidShare... thanks god, doaku selama ini telah Engkau dengarkan...hahahaha
Nah, kali ini gua coba berbagi info, gimana caranya buat kalian ngeleech file, trus lo bisa donlot deh....
Step 1
Langkah pertama, yg jelas, kompie lo musti konek ke internet, hehe....
setelah langkah penting diatas, lo musti daftar dulu ke websitenya, gratis kok. Daftarnya DISINI.
 Daftar Gratis
Step 2
Setelah lo daftar secara gratis. Untuk ngeleech Rapidshare, lo harus login dulu pastinya. Fitur Leech Rapidshare, termasuk pada Fitur Upload File, jadi lo pilih Upload Files. kemudian pilih opsi "Free RapidShare Leech". Masukkan link rapidshare yg udah lama lo simpan, moga aja linknya gak mokat, hehehe
Setelah lo daftar secara gratis. Untuk ngeleech Rapidshare, lo harus login dulu pastinya. Fitur Leech Rapidshare, termasuk pada Fitur Upload File, jadi lo pilih Upload Files. kemudian pilih opsi "Free RapidShare Leech". Masukkan link rapidshare yg udah lama lo simpan, moga aja linknya gak mokat, hehehe
 Mulailah Leeching RapidShare Link
 Leechingnya cepet gila.
Step 3
Jika proses Leeching dari enterupload berhasil maka akan tampil hasil seperti gambar dibawah ini. Ada beberapa opsi link utk beberapa penggunaan, kaya url forum, direct link, ma link buat hapus. Buat donlot lo bisa ngeliat di-my files, trus pilih file yg mo lo donlot, ato pilih direct link saat proses baru aja selesai.
 Beberapa opsi Link File yg baru diupload
Step 4
Saat lo berada pada page direct link dari file yg lo pilih, maka akan muncul page seperti gambar berikut. Seperti biasanya, sebagai anggota perkumpulan orang tanpa modal, lo musti milih opsi yg Free Download. Setelah lo pilih yg Free Download, secara otomatis akan muncul page utk Create Download Link, setelah 30 detik, maka akan segera muncul tombol utk Create Download Linknya, dan jika lo masukin captcha dengan benar, maka server segera mengcreate download linknya.
 Pilih Opsi yg Free Download
 Create Download Link
Step 5
The Final Step, setelah lo klik tombol Create Download Link, segera muncul direct link, yg unik yg hanya utk IP lo, masa idup tuh link cuman 24 jam, coz kalo sampe 2x24 jam, musti lapor RT setempat, hehehe.... Utk masalah kecepatan donlotannya, gua rasa hampir mirip kayak MediaFire, hanya saja ada waktu mokatnya. Tapi kalo beruntung lo bisa cepet banget kok, sebenernya sangat bergantung ma kecepata ISP lo. But, its fine, now we can download rapidshare link. mang kalo gratisan, musti sabar, hehehe...
 Its Download Time...
NB: Max upload dari link rapid 20 link per 24 jam
Friday, July 22, 2011
Download....
Sebelum download, cek dulu link2 yang akan didownload dengan link-checker :
http://wgtools.com/link-checker/
Join File2 hasil download dengan ini :
HJSplit (untuk file ber-extensi .001 .002 .003 dst)
http://www.mediafire.com/?j5mzhnkl3od
ALZip (untuk file ber-extensi .a01 .a02 .alz dst)
http://www.mediafire.com/?jyhzit3jzxt
7Zip (untuk file ber-extensi .rar)
http://www.mediafire.com/?gt02oymftow
Jika menemukan file .rar yang berpassword dan passwordnya tidak tersedia di sini, maka gunakanlah ini:
http://www.mediafire.com/?aoyb1zdingi
Tuesday, July 19, 2011
How to Add New Subtitles to an Existing DVD 2
If you want to add another subtitle language to your DVD, and you don’t mind loosing the menu, here is a guide to help you do it, using only freeware tools.
What do you need (see [url=http://www.doom9.org[/url] or ):
• DVDshrink (release 3.1 or later), to compress the DVD, and create a backup on your hard disk.
• Subtitle workshop (optional), to convert subtitles to SubRip *.srt or *.sub format.
• SubtitleCreator (needs .NET or WinXP SP2) to convert *.srt or *.sub files to *.sup subtitles streams
• VobEdit, to demux DVD *.vob files to separate movie, audio and subtitle streams
• IfoEdit, to put video, audio, and subtitles back together again
• Alternatively, in case you have NTSC movies instead of PAL, use ReJig instead of VobEdit and IfoEdit, as there have been many problems reported with IfoEdit+NTSC.
• DVD burning software
• At least 9Gb available on your hard disk.
The main steps are explained below:
1) Rip the DVD to the hard disk
2) Demultiplex DVD using VobEdit to separate audio, video and subtitle streams
3) [Optional] Convert subtitles to *.srt or *.sub
4) Convert and synchronise subtitles to *.sup (DVD format)
5) Multiplex DVD using IfoEdit of ReJig to a full DVD again
6) Test & burn
1. Copy the original DVD to your hard disk using DVD Shrink (see Figure 1).
a) Open disc (top left)
b) Enter re-author mode (top middle): Drag everything that you want to keep, excluding the menus, from the right DVD browser window to the left window. Here, only the main movie is preserved. But, alternatively, you can also copy the extras to your re-authored DVD, and they will be included as additional chapters at the end of your movie.
Although DVD Shrink is very good in keeping the menus, after adding the subtitles they won’t work anymore unless you go through some very elaborate steps. The reason for this is that the corresponding IFO file, generated at the end of the process described here, doesn’t know anything about the menu structure. There are two elaborate solutions that I didn’t try myself, that you might want to look into if you are really keen on preserving everything. The first is by searching for IfoUpdate, the other is by doing everything
manually.
c) Select the compression tab, and deselect any audio and subtitles that you don’t need – deselect the audio because they cost a lot of space, deselect the subtitles so you don’t have to include them anymore later on.
d) As you see, I've only selected the main movie, although you might add some additional deleted scenes...
e) Press backup DVD (top menu) and select where you want the output to go. Although DVD shrink includes an interface with Nero, allowing it to directly write your stuff to a DVD, you would be better to deselect this option in the preferences, as we still need to add our new subtitle. Additionally, if you have to compress a lot (say to less than 80%), it is good to set the deep analysis mode (tab ‘Backup options’), leading to a better video quality.

Figure 1. DVDShrink allows you to copy only the selected features to your hard disk. In also automatically computes the optimal compression for you, so the movie will fit on a single-sided DVD.
2. Demultiplex original DVD VOB files using VobEdit or ReJig file mode (see Figure 2)
After DVDshrink has copied everything to the hard disk, you will have a set of IFO (InFOrmation), BUP (BackUP copies of IFO), and VOB (Video OBject) files on your hard disk. The largest IFO contains the movie.
a) Start VobEdit, and open the first *.VOB file, which has the same name as the largest IFO file (2c).
b) Demux the VOB: as you already have selected everything in DVDshrink that you want to keep, you can demux all video (*.m2v), audio (*.ac3), and subtitles (*.sup) to a new location on your HD (4a+b).
NOTE: Sometimes, IfoEdit will complain about “Too many frame drops”. The only remedy is to either remove some of the original subtitle streams and try again or to try with ReJig.
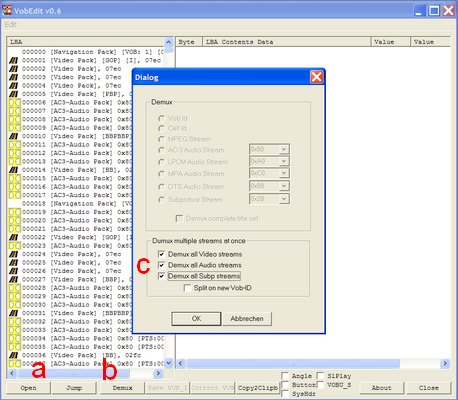
Figure 2. VobEdit allows you to demultiplex (unpack) the VOB files to separate mpeg2 video (*.m2v) files, audio (*.ac3) files, and subtitle (*.sup) files.
3. Convert subtitles to SubRip (*.srt) format using Subtitle workshop (see Figure 3)
Optionally, it sometimes happens that the subtitle files you download from sites such as http://extratitles.to are not in *.srt or *.sub format. In that case, I recommend Subtitle Workshop to convert it to *.srt format. Note the input and output frame rate settings (3a). Knowing the length of my DVD (from the box), I can check the time of the last subtitle to see whether it was in NTSC or PAL (3b) – note that you need to reserve some room for the end titles (actors names etc). Finally, save it as SubRip.

Figure 3. Subtitle Workshop can convert every subtitle format to any other. It also allows you to create new subtitles, but we don't need that feature here.
Further note that I first had some trouble to see special characters correctly (3c+d): I had to use the Central European font in this tool, but I also needed to change my general computer settings (Control panel/Regional settings/Advanced/Non-unicode language/ to Romanian).
4. Convert *.srt or *.sub subtitles to *.sup stream using SubtitleCreator (see Figure 4).
a) Open your downloaded subtitle file (in *.srt or *.sub format). If the source subtitle file consists of multiple parts, you can concatenate them.
b) Open the IFO file of the current DVD (normally VTS_01_0.IFO)
c) Press start to generate your *.sup file
Optionally, you might use:
• The Font Settings tab, to select different colors (Figure 4a)
• The Synchronize tab, to shift time or synchronize with an original *.sup. (Figure 4b)
• The Preview button, to change the position of the subtitle based on the DVD format (Figure 4c)

Figure 4. SubtitleCreator's main window is simple: choose the subtitle and IFO file, and convert it to a *.sup file.

Figure 4a. SubttitleCreator can do fancier stuff though. You can choose the font, font size, and colors (from the IFO palette) to use for the subtitle (default is white letters with a black outline and grey anti-aliasing on a transparent dark grey background).

Figure 4b. Except simple synchronization, like time shifting and frame rate conversion, you can also use an original and therefore synchronized subtitle (*.sup) file, and by selecting similar lines in the original and new subtitle, you can synchronize the new one as well.

Figure 4c. And finally, you can preview the position of the subtitle, also by opening a screenshot from your movie.
(Sorry that I have so many of these, but I wrote this program myself, so I hope you don't mind it too much - BTW, it's open source, so if you don't like it, you can change it...)
Note that the following two steps can also be done using Nik’s freeware tool, ReJig, which has almost identical interfaces, and has better support for NTSC movies: instead of step 4, select ReJig’s file mode, instead of step 5, select ReJig’s DVD Author mode. However, it is slower and produces large temporary files, so I normally prefer IfoEdit and VobEdit.
5. Author new DVD using IfoEdit or ReJig DVD author mode (see Figure 5a+b)
a) Start IfoEdit and open (a) the IFO file of movie (same file as in step 2)
b) Select VTS_PGC_1 (b) and save cell times to file (c) under the tools menu (tells you where a chapter begins) and CLOSE IfoEdit
c) Start IfoEdit again and select menu item DVD Author (e)/Author new DVD (this has to be the first thing that you do in IfoEdit, else this item is not available).
d) Now have a look at Figure 5b: Select the files created by VobEdit: first the *.m2v (a), then all audio files (b), finally all subtitles (c), including the one you created in step 3.
e) Set the corresponding languages of all subtitles (d)
f) Load the cell times (previously saved in step 5b) for the chapters (e). If you use ReJig, you can also load the original IFO file, containing the color palette.
g) Select where you want your output to go (f) and save the new DVD (g) – this one containing your new subtitle!
Note: If you don’t have a lot of free space on your HD, you can now delete the original DVD files used in step 4, as long as you don’t delete the IFO file with the same name.

Figure 5a. IfoEdit (or ReJig) allows you to multiplex (package) your DVD together again. It also allows you to save the celltimes, i.e. the start times expressed as framenumber of your chapters, and to copy the color palette from the original IFO file to the new one created by IfoEdit.

Figure 5b. Select all the files to pack them together again. After IfoEdit has finished (30 minutes), you still need to copy the colors from the original to the new one, save it, and you are finally done!
h) After IfoEdit finishes, you only need to copy the subtitle colors from the original IFO to the new IFO: open the original IFO (see Figure 5a, item(a)), select VTS_PGC_1 (b), and go to the subtitle color menu (d): copy color info. Now, select the new IFO (second file in the top window), go to the same location in this file (b), and paste the color info (d). Save the IFO (e). In case you use ReJig, you don’t have to do this anymore, as you already selected the IFO in step f.
6. Test the output and write to an empty DVD
Using a DVD player (e.g. VideoLAN, WinDVD or VLC media player) that can play from the hard disk, you can already inspect whether the DVD was authored correctly. If you are satisfied, burn the files to a DVD (in the VIDEO_TS folder and enjoy!
Source
What do you need (see [url=http://www.doom9.org[/url] or ):
• DVDshrink (release 3.1 or later), to compress the DVD, and create a backup on your hard disk.
• Subtitle workshop (optional), to convert subtitles to SubRip *.srt or *.sub format.
• SubtitleCreator (needs .NET or WinXP SP2) to convert *.srt or *.sub files to *.sup subtitles streams
• VobEdit, to demux DVD *.vob files to separate movie, audio and subtitle streams
• IfoEdit, to put video, audio, and subtitles back together again
• Alternatively, in case you have NTSC movies instead of PAL, use ReJig instead of VobEdit and IfoEdit, as there have been many problems reported with IfoEdit+NTSC.
• DVD burning software
• At least 9Gb available on your hard disk.
The main steps are explained below:
1) Rip the DVD to the hard disk
2) Demultiplex DVD using VobEdit to separate audio, video and subtitle streams
3) [Optional] Convert subtitles to *.srt or *.sub
4) Convert and synchronise subtitles to *.sup (DVD format)
5) Multiplex DVD using IfoEdit of ReJig to a full DVD again
6) Test & burn
1. Copy the original DVD to your hard disk using DVD Shrink (see Figure 1).
a) Open disc (top left)
b) Enter re-author mode (top middle): Drag everything that you want to keep, excluding the menus, from the right DVD browser window to the left window. Here, only the main movie is preserved. But, alternatively, you can also copy the extras to your re-authored DVD, and they will be included as additional chapters at the end of your movie.
Although DVD Shrink is very good in keeping the menus, after adding the subtitles they won’t work anymore unless you go through some very elaborate steps. The reason for this is that the corresponding IFO file, generated at the end of the process described here, doesn’t know anything about the menu structure. There are two elaborate solutions that I didn’t try myself, that you might want to look into if you are really keen on preserving everything. The first is by searching for IfoUpdate, the other is by doing everything
manually.
c) Select the compression tab, and deselect any audio and subtitles that you don’t need – deselect the audio because they cost a lot of space, deselect the subtitles so you don’t have to include them anymore later on.
d) As you see, I've only selected the main movie, although you might add some additional deleted scenes...
e) Press backup DVD (top menu) and select where you want the output to go. Although DVD shrink includes an interface with Nero, allowing it to directly write your stuff to a DVD, you would be better to deselect this option in the preferences, as we still need to add our new subtitle. Additionally, if you have to compress a lot (say to less than 80%), it is good to set the deep analysis mode (tab ‘Backup options’), leading to a better video quality.
Figure 1. DVDShrink allows you to copy only the selected features to your hard disk. In also automatically computes the optimal compression for you, so the movie will fit on a single-sided DVD.
2. Demultiplex original DVD VOB files using VobEdit or ReJig file mode (see Figure 2)
After DVDshrink has copied everything to the hard disk, you will have a set of IFO (InFOrmation), BUP (BackUP copies of IFO), and VOB (Video OBject) files on your hard disk. The largest IFO contains the movie.
a) Start VobEdit, and open the first *.VOB file, which has the same name as the largest IFO file (2c).
b) Demux the VOB: as you already have selected everything in DVDshrink that you want to keep, you can demux all video (*.m2v), audio (*.ac3), and subtitles (*.sup) to a new location on your HD (4a+b).
NOTE: Sometimes, IfoEdit will complain about “Too many frame drops”. The only remedy is to either remove some of the original subtitle streams and try again or to try with ReJig.
Figure 2. VobEdit allows you to demultiplex (unpack) the VOB files to separate mpeg2 video (*.m2v) files, audio (*.ac3) files, and subtitle (*.sup) files.
3. Convert subtitles to SubRip (*.srt) format using Subtitle workshop (see Figure 3)
Optionally, it sometimes happens that the subtitle files you download from sites such as http://extratitles.to are not in *.srt or *.sub format. In that case, I recommend Subtitle Workshop to convert it to *.srt format. Note the input and output frame rate settings (3a). Knowing the length of my DVD (from the box), I can check the time of the last subtitle to see whether it was in NTSC or PAL (3b) – note that you need to reserve some room for the end titles (actors names etc). Finally, save it as SubRip.
Figure 3. Subtitle Workshop can convert every subtitle format to any other. It also allows you to create new subtitles, but we don't need that feature here.
Further note that I first had some trouble to see special characters correctly (3c+d): I had to use the Central European font in this tool, but I also needed to change my general computer settings (Control panel/Regional settings/Advanced/Non-unicode language/ to Romanian).
4. Convert *.srt or *.sub subtitles to *.sup stream using SubtitleCreator (see Figure 4).
a) Open your downloaded subtitle file (in *.srt or *.sub format). If the source subtitle file consists of multiple parts, you can concatenate them.
b) Open the IFO file of the current DVD (normally VTS_01_0.IFO)
c) Press start to generate your *.sup file
Optionally, you might use:
• The Font Settings tab, to select different colors (Figure 4a)
• The Synchronize tab, to shift time or synchronize with an original *.sup. (Figure 4b)
• The Preview button, to change the position of the subtitle based on the DVD format (Figure 4c)
Figure 4. SubtitleCreator's main window is simple: choose the subtitle and IFO file, and convert it to a *.sup file.
Figure 4a. SubttitleCreator can do fancier stuff though. You can choose the font, font size, and colors (from the IFO palette) to use for the subtitle (default is white letters with a black outline and grey anti-aliasing on a transparent dark grey background).
Figure 4b. Except simple synchronization, like time shifting and frame rate conversion, you can also use an original and therefore synchronized subtitle (*.sup) file, and by selecting similar lines in the original and new subtitle, you can synchronize the new one as well.
Figure 4c. And finally, you can preview the position of the subtitle, also by opening a screenshot from your movie.
(Sorry that I have so many of these, but I wrote this program myself, so I hope you don't mind it too much - BTW, it's open source, so if you don't like it, you can change it...)
Note that the following two steps can also be done using Nik’s freeware tool, ReJig, which has almost identical interfaces, and has better support for NTSC movies: instead of step 4, select ReJig’s file mode, instead of step 5, select ReJig’s DVD Author mode. However, it is slower and produces large temporary files, so I normally prefer IfoEdit and VobEdit.
5. Author new DVD using IfoEdit or ReJig DVD author mode (see Figure 5a+b)
a) Start IfoEdit and open (a) the IFO file of movie (same file as in step 2)
b) Select VTS_PGC_1 (b) and save cell times to file (c) under the tools menu (tells you where a chapter begins) and CLOSE IfoEdit
c) Start IfoEdit again and select menu item DVD Author (e)/Author new DVD (this has to be the first thing that you do in IfoEdit, else this item is not available).
d) Now have a look at Figure 5b: Select the files created by VobEdit: first the *.m2v (a), then all audio files (b), finally all subtitles (c), including the one you created in step 3.
e) Set the corresponding languages of all subtitles (d)
f) Load the cell times (previously saved in step 5b) for the chapters (e). If you use ReJig, you can also load the original IFO file, containing the color palette.
g) Select where you want your output to go (f) and save the new DVD (g) – this one containing your new subtitle!
Note: If you don’t have a lot of free space on your HD, you can now delete the original DVD files used in step 4, as long as you don’t delete the IFO file with the same name.
Figure 5a. IfoEdit (or ReJig) allows you to multiplex (package) your DVD together again. It also allows you to save the celltimes, i.e. the start times expressed as framenumber of your chapters, and to copy the color palette from the original IFO file to the new one created by IfoEdit.
Figure 5b. Select all the files to pack them together again. After IfoEdit has finished (30 minutes), you still need to copy the colors from the original to the new one, save it, and you are finally done!
h) After IfoEdit finishes, you only need to copy the subtitle colors from the original IFO to the new IFO: open the original IFO (see Figure 5a, item(a)), select VTS_PGC_1 (b), and go to the subtitle color menu (d): copy color info. Now, select the new IFO (second file in the top window), go to the same location in this file (b), and paste the color info (d). Save the IFO (e). In case you use ReJig, you don’t have to do this anymore, as you already selected the IFO in step f.
6. Test the output and write to an empty DVD
Using a DVD player (e.g. VideoLAN, WinDVD or VLC media player) that can play from the hard disk, you can already inspect whether the DVD was authored correctly. If you are satisfied, burn the files to a DVD (in the VIDEO_TS folder and enjoy!
Source
How to Add New Subtitles to an Existing DVD 1
1. Convert file film ke bentuk DVD files(ada Video_TS, Audio_TSnya).. convert dlm format 16:9 widescreen
2. Convert Subtitle SRT ke SUP.. Gunakan Subtitle Creator, open SRT dan save menjadi SUP
3. Di menu SubtitleCreator: Tools, DVD Authoring Wizard(CTRL+W)
4. Locate PGCDemux, Muxman, dan VOBBlanker dgn browse ke file tsb
5. Locate DVD(Video_TS.VOB dlm folder Video_TS)
6. Tentukan Output Folder, klik Next
7. Tentukan Language Subtitle, dan browse .SUP nya
8. Start
9. Setelah proses selesai browse ke output folder, coba play video_ts.vob dgn player yg ada, kalo playernya MPC play file video_ts.ifo.. perhatikan subtitle yg apakah sdh benar apa blm jk ada yg kurang buka DVD SUb Edit
10. di DVD Sub Edit, Open VOB files (misal: vts_01_0/1/2/3/dst) open dan edit satu demi satu
11. tentukan subpic selection(language subtitle yg mau diedit)
12. b= background, p=pixel(warna huruf), e1=outline(tebal grs huruf), e2=bayangan
13. pertama di all pixel b=p=white, e1=e2=black
14. lalu setting b,p,e1 dan e2 secara terpisah
15. b-> transparan 0
16. p-> transparan 15
17. e1->transparan 11
18. e2->transparan 0
19. di menu edit: apply last modification to all
20. save all modifications
21. ulangi langkah di atas(No:10-20) utk file kedua dst
22. no vertical border.. slide ke adegan yg subtitlenya 2 baris, lalu geser vertical position hingga baris 2 subtitle berada di atas batas bawah film dan geser sedikit ke atas lagi supaya mata lbh nyaman wkt menonton dan membaca subtitlenya
Jika dgn subtitle creator Background 3-0, Text 3-15, Outline 2-11, Anti-alias 2-0
23. burn ke DVDblank.. di Nero pilih Video Picture, DVD video files, lalu add 2 folder yg telah tersedia yaitu folder Audio_TS dan Video_TS
This is a step by step guide that walks you through two different ways of adding new subtitles to an existing DVD. This can be accomplished without converting the video or audio and without changing the menus.
Step 1: Getting Ready
First, you will want to make sure you have downloaded and installed the following software:
DVDFab Decrypter
SubtitleCreator
PgcDemux
Muxman
VobBlanker
PgcEdit
Step 2: Rip the DVD
If you already have an image of the DVD on your hard drive, you can skip this step.
Use DVDFab Decrypter to rip the DVD.
Step 3: Create the New Subtitle File
SubtitleCreator is a tool that creates, modifies, and converts ASCII-based text files in SRT or SUB format to the binary SUP format expected by many DVD authoring tools. Launch SubtitleCreator. If you have an SRT file with subtitles already (in case you may have downloaded it from a subtitle site), then open that file. If you want to use subtitles from the DVD you have ripped, then open the "VTS_01_0.IFO" file which you should find in the "VIDEO_TS" directory of your ripped DVD. You can also use SubtitleCreator to make a completely new set of subtitles.
Once you have finished creating/editing the subtitles, save them in SUP format (look under the Files menu).
Step 4: Generate the new DVD Files with SubtitleCreator
Start the DVD Authoring Wizard in SubtitleCreator by selecting DVD Authoring under the Tools menu. You will need to provide the location of pgcdemux.exe, muxman.exe and vobblanker.exe files (you should have downloaded and installed these in Step 1 above). Then select the "VIDEO_TS" directory from your ripped DVD, choose an output folder which will hold the new DVD files, and load the SUP file that you created in step 2 above. Then you can click the Start button on the DVD Authoring window.
After processing finishes, you should have a new "VIDEO_TS" folder in the output directory you chose with VOB, IFO and BUP files. Try to play the "VIDEO_TS" folder with a software player like PowerDVD, WinDVD, Media Player Classic (you must open the VIDEO_TS.IFO file with MPC) and try to select the subtitle track. You may need to select the subtitles in the software player menu or on your remote control subtitle button because the DVD menu might not work as expected.


Step 5: Demultiplex the Audio/Video from the Ripped DVD
If the DVD files from step 4 do not seem to play with subtitles correctly, then you can try to accomplish the same thing that SubtitleCreator does but using the tools yourself. First, launch PgcDemux (you should have downloaded and installed this in step 1). For Input IFO, select the "VTS_01_0.IFO" file which you should find in the "VIDEO_TS" directory of your ripped DVD. Pick an output folder. Make sure that "by VOB id" is selected under Mode and that "Titles" is selected under Domain. Check the options "Demux video stream", "Demux all audio streams", "Demux all subpic streams, and "Create CellTimes.txt". Then you can click Process.

Step 6: Generate the new DVD Files with Muxman
Launch Muxman (you should have downloaded and installed this in step 1). For the video input, select the .M2C file that should be in the output folder you chose in step 5. For the video input, select the .AC3 file from that same location. Then, under SubPictures, select the SUP file that you created in step 3. You will need to select a language. Finally, under the File menu, click Import and open the "CellTimes.txt" file which should also be in the output folder from step 5. Once you've set these options, then you can click Start.

Step 7: Restore the Original Menus to the New DVD [OPTIONAL]
Launch VobBlanker. For input, open the "VIDEO_TS.IFO" from the original, ripped DVD. Pick an output folder. In the TitleSet section, select the main movie VOB file - this will usually be the largest file showing up something like "VTS_01_*.VOB". In the section labelled PGCs in Selected TitleSet, click the Replace button, and open the VTS_01_0.IFO file that was created in step 6. Once you've set these options, you can click the Process button.
After processing finishes, you should have a new "VIDEO_TS" folder in the output directory you chose with VOB, IFO and BUP files. Try to play the "VIDEO_TS" folder with a software player like PowerDVD, WinDVD, Media Player Classic (you must open the VIDEO_TS.IFO file with MPC) and try to select the subtitle track. You may need to select the subtitles in the software player menu or on your remote control subtitle button because the DVD menu might not work as expected.
If you you are adding subtitles to a DVD for the first time (the DVD did not already have subtitles), or if you are changing the number of subtitle tracks, then you have to enable the new subtitles. Skip to step 9 to do that.
If you only edited the subtitles without actually changing the number of subtitles tracks, and if your resulting DVD files play with subtitles, then you are finished and you can skip to Step 9.

Step 8: Enable New Subtitles [OPTIONAL]
Launch PGCEdit (you should have downloaded and installed this in step 1). Open the new DVD. Find the video segment with the new subtitles and double click it. Look in the section labelled ""Sub-picture VOB's Decoding Streams" - you should see that either there are no subtitles listed (because you added new subtitles to a DVD without any to begin with) or you may see only the subtitle tracks that were already on the DVD, and none of the new subtitles you added.


Click the first empty stream (the empty streams are labelled 'none'). A new window (Subpic streams setup) will open. In that window, click the Set button. These settings assume you have a 4:3 aspect ratio DVD. If your DVD is 16:9, you may need to examine how any other subtitle tracks are setup and configure the new subtitles accordingly.
If you are adding subtitles to a DVD that had none to begin with, and if you made only one subtitle track in Muxman (Track 1: W20 LB20) then both wide and letterbox stay at zero.
If you are adding subtitles to a DVD that had none to begin with, and if you made 2 separate subtitle tracks, perhaps one track for wide screen and another for letterbox (Track 1: W20 LB21), then leave wide set to zero and set letterbox to one.
If you are adding subtitles to a DVD that already has subtitles, then use the next available numbers for wide screen and letterbox. Note: a 4:3 DVD has one subtitle track but a 16:9 DVD must have two subtitle tracks, even if they are both the same.
Once you've made those settings, click the OK button. On the main screen, find and click the Stream attributes button (looks like a green film reel icon). You will get a pop up with a message about fixing the number of subtitle streams. Click Yes. You can set the language and type of subtitle on the next screen, and then exit back to the main screen again.
Find the video segment with the new subtitles and double click it. This time you should see the new subtitle track you added. Save the DVD using the Save item under the File menu. Try to play the DVD and verify that the new subtitles are working.


Step 9: Burn the DVD
Use your favorite DVD burning software, like Nero Burning Rom or ImgBurn, and burn the new VIDEO_TS with .
General troubleshooting steps you can try if things aren't working right:
(1) Make sure the SUP file you made in step 3 is good. Open it in SubtitleCreator using the Manipulate SUP menu item under the Toole menu, and check if you can see the dialog, and whether the timings look correct. You can use SubtitleWorkshop which may be able to fix any errors. Open the SRT file with SubtitleWorkshop and type CTRL+I. Then click Fix Errors, and then save the file again.
(2) Check the muxman.log after step 4 or step 6 to make sure subtitles were muxed in. You can find the log file in the root of the C drive. It may contain error messages or other information to help you figure out what isn't working.
(3) When using Muxman in step 6 for a 16:9 DVD, be sure to load each SUP file twice. Open the first SUP file and click on Wide followed by LB. Then open the 2nd SUP file and click on Wide followed by LB.
(3) Using VobBlanker, compare your ripped DVD in VobBlanker with the new DVD. Check to see where any cells are different.
(4) Using PGCEdit, run a trace on the ripped DVD and the new DVD. If you see that the last cell is being played first, you can edit the commands to make it play where it's supposed to.
(5) Using PGCEdit, open the new DVD that was produced with VobBlanker. Highlight the movie. Use the "Replace VTST Titles" menu item under the Files menu, and follow the instructions. You will need to select the Muxman muxed movie. You should click Yes for the first question. It is a good idea to let PGCEdit make a backup of the current VOBs as well. When PGCEdit finished, the DVD should play correctly.
Q: If I skip the optional Step 7 (using VobBlanker to retain menus), can I skip step 8?
A: Yes. Step 8 is only necessary if you do step 7.
Q: I ran PgcEdit on the output folder from Muxman. It shows that it has a Sub-picture stream 0 with Wide(1) and Letterbox(0). When I play that DVD, I still see no subtitles, my player's Subtitle menu option is disabled.
A: Open all of the DVD VOB files in DVDSubEdit. The SubPic/Transparency slider should be all the way to the left, to "Clear". If you still can't see the sibtitles, try moving the SubPic Vertical Position slider to try and bring them into view.
Q: My subtitles are all black. If I click the "Use prefered subtitles" my subtitles turn pink, yellow and black.
A: Use DVDSubEdit to open all the VOBs from the new DVD and change the colors.
Q: My subtitles are fine when I test the DVD using my software player. But after I burn the DVD, the subtitles turn green.
A: Either use DVDSubEdit to open the VOBs, or use PGCEdit to open the new DVD. Check the Color Look Up Table (CLUT) which will probably be set to the color you are seeing. You can edit the CLUT in either program.
Q: How can I remove the FBI Anti-Piracy screen from the DVD?
A: You can force the screen to be skipped by using PGCEdit to open the DVD, find the FBI screen, and then using the "Kill PGC Playback" menu item.
Q: How can I synchronize DVD subtitles with a SUP file before adding it to the DVD?
A: Use SubtitleCreator to apply a delay to the SUP file. Open the SUP file, find the Delay menu item, set the delay you need, then save the SUP file. DVDSubEdit will let you do a similar delay to the VOBs themselves.
Q: What is the best way to check subtitles on a ripped DVD?
A: Play the DVD and checking the subtitle languages in PowerDVD another software player. Or use PGCEdit follow along step 8 above to view the subtitle tracks.
Q: How can I check the region of the DVD?
A: Use PGCEdit to openthe DVD, then click the Globe button in the top menu to list the region coding of the DVD.
Q: How can I add a sutitle button to the menu page?
A: This is not easy and requires editing more than just subtitles, but the general approach is: edit the menu to add in the new sub text; edit the underlying subpic to add the new sub text; add a new button;add a new menu command that defines what happens when the new menu button is clicked.
Q: How can I strip subtitles from an AVI and replace those with subtitles in a different language?
A: You cannot strip subtitles if they have been encoded onto the video itself. You can check your AVI with a tool like VirtualDub. When you open the AVI in such a tool, if you see subtitles, then they are part of the video itself and cannot be (easily) removed.
Q: I still can't see any subtitles.
A: Subtitles may not appear by default when playing the DVD - you may have to turn them on in your software player's setup menu or options. If all else fails, try burning the DVD and testing it in a real stand alone player.
Q: How can I change the button of a menu?
A: You must edit the underlying subpic. Use DVDSubEdit. PGCEdit will also allow you to adjust the button outlines.
Source
2. Convert Subtitle SRT ke SUP.. Gunakan Subtitle Creator, open SRT dan save menjadi SUP
3. Di menu SubtitleCreator: Tools, DVD Authoring Wizard(CTRL+W)
4. Locate PGCDemux, Muxman, dan VOBBlanker dgn browse ke file tsb
5. Locate DVD(Video_TS.VOB dlm folder Video_TS)
6. Tentukan Output Folder, klik Next
7. Tentukan Language Subtitle, dan browse .SUP nya
8. Start
9. Setelah proses selesai browse ke output folder, coba play video_ts.vob dgn player yg ada, kalo playernya MPC play file video_ts.ifo.. perhatikan subtitle yg apakah sdh benar apa blm jk ada yg kurang buka DVD SUb Edit
10. di DVD Sub Edit, Open VOB files (misal: vts_01_0/1/2/3/dst) open dan edit satu demi satu
11. tentukan subpic selection(language subtitle yg mau diedit)
12. b= background, p=pixel(warna huruf), e1=outline(tebal grs huruf), e2=bayangan
13. pertama di all pixel b=p=white, e1=e2=black
14. lalu setting b,p,e1 dan e2 secara terpisah
15. b-> transparan 0
16. p-> transparan 15
17. e1->transparan 11
18. e2->transparan 0
19. di menu edit: apply last modification to all
20. save all modifications
21. ulangi langkah di atas(No:10-20) utk file kedua dst
22. no vertical border.. slide ke adegan yg subtitlenya 2 baris, lalu geser vertical position hingga baris 2 subtitle berada di atas batas bawah film dan geser sedikit ke atas lagi supaya mata lbh nyaman wkt menonton dan membaca subtitlenya
Jika dgn subtitle creator Background 3-0, Text 3-15, Outline 2-11, Anti-alias 2-0
23. burn ke DVDblank.. di Nero pilih Video Picture, DVD video files, lalu add 2 folder yg telah tersedia yaitu folder Audio_TS dan Video_TS
This is a step by step guide that walks you through two different ways of adding new subtitles to an existing DVD. This can be accomplished without converting the video or audio and without changing the menus.
Step 1: Getting Ready
First, you will want to make sure you have downloaded and installed the following software:
DVDFab Decrypter
SubtitleCreator
PgcDemux
Muxman
VobBlanker
PgcEdit
Step 2: Rip the DVD
If you already have an image of the DVD on your hard drive, you can skip this step.
Use DVDFab Decrypter to rip the DVD.
Step 3: Create the New Subtitle File
SubtitleCreator is a tool that creates, modifies, and converts ASCII-based text files in SRT or SUB format to the binary SUP format expected by many DVD authoring tools. Launch SubtitleCreator. If you have an SRT file with subtitles already (in case you may have downloaded it from a subtitle site), then open that file. If you want to use subtitles from the DVD you have ripped, then open the "VTS_01_0.IFO" file which you should find in the "VIDEO_TS" directory of your ripped DVD. You can also use SubtitleCreator to make a completely new set of subtitles.
Once you have finished creating/editing the subtitles, save them in SUP format (look under the Files menu).
Step 4: Generate the new DVD Files with SubtitleCreator
Start the DVD Authoring Wizard in SubtitleCreator by selecting DVD Authoring under the Tools menu. You will need to provide the location of pgcdemux.exe, muxman.exe and vobblanker.exe files (you should have downloaded and installed these in Step 1 above). Then select the "VIDEO_TS" directory from your ripped DVD, choose an output folder which will hold the new DVD files, and load the SUP file that you created in step 2 above. Then you can click the Start button on the DVD Authoring window.
After processing finishes, you should have a new "VIDEO_TS" folder in the output directory you chose with VOB, IFO and BUP files. Try to play the "VIDEO_TS" folder with a software player like PowerDVD, WinDVD, Media Player Classic (you must open the VIDEO_TS.IFO file with MPC) and try to select the subtitle track. You may need to select the subtitles in the software player menu or on your remote control subtitle button because the DVD menu might not work as expected.
Step 5: Demultiplex the Audio/Video from the Ripped DVD
If the DVD files from step 4 do not seem to play with subtitles correctly, then you can try to accomplish the same thing that SubtitleCreator does but using the tools yourself. First, launch PgcDemux (you should have downloaded and installed this in step 1). For Input IFO, select the "VTS_01_0.IFO" file which you should find in the "VIDEO_TS" directory of your ripped DVD. Pick an output folder. Make sure that "by VOB id" is selected under Mode and that "Titles" is selected under Domain. Check the options "Demux video stream", "Demux all audio streams", "Demux all subpic streams, and "Create CellTimes.txt". Then you can click Process.
Step 6: Generate the new DVD Files with Muxman
Launch Muxman (you should have downloaded and installed this in step 1). For the video input, select the .M2C file that should be in the output folder you chose in step 5. For the video input, select the .AC3 file from that same location. Then, under SubPictures, select the SUP file that you created in step 3. You will need to select a language. Finally, under the File menu, click Import and open the "CellTimes.txt" file which should also be in the output folder from step 5. Once you've set these options, then you can click Start.
Step 7: Restore the Original Menus to the New DVD [OPTIONAL]
Launch VobBlanker. For input, open the "VIDEO_TS.IFO" from the original, ripped DVD. Pick an output folder. In the TitleSet section, select the main movie VOB file - this will usually be the largest file showing up something like "VTS_01_*.VOB". In the section labelled PGCs in Selected TitleSet, click the Replace button, and open the VTS_01_0.IFO file that was created in step 6. Once you've set these options, you can click the Process button.
After processing finishes, you should have a new "VIDEO_TS" folder in the output directory you chose with VOB, IFO and BUP files. Try to play the "VIDEO_TS" folder with a software player like PowerDVD, WinDVD, Media Player Classic (you must open the VIDEO_TS.IFO file with MPC) and try to select the subtitle track. You may need to select the subtitles in the software player menu or on your remote control subtitle button because the DVD menu might not work as expected.
If you you are adding subtitles to a DVD for the first time (the DVD did not already have subtitles), or if you are changing the number of subtitle tracks, then you have to enable the new subtitles. Skip to step 9 to do that.
If you only edited the subtitles without actually changing the number of subtitles tracks, and if your resulting DVD files play with subtitles, then you are finished and you can skip to Step 9.
Step 8: Enable New Subtitles [OPTIONAL]
Launch PGCEdit (you should have downloaded and installed this in step 1). Open the new DVD. Find the video segment with the new subtitles and double click it. Look in the section labelled ""Sub-picture VOB's Decoding Streams" - you should see that either there are no subtitles listed (because you added new subtitles to a DVD without any to begin with) or you may see only the subtitle tracks that were already on the DVD, and none of the new subtitles you added.
Click the first empty stream (the empty streams are labelled 'none'). A new window (Subpic streams setup) will open. In that window, click the Set button. These settings assume you have a 4:3 aspect ratio DVD. If your DVD is 16:9, you may need to examine how any other subtitle tracks are setup and configure the new subtitles accordingly.
If you are adding subtitles to a DVD that had none to begin with, and if you made only one subtitle track in Muxman (Track 1: W20 LB20) then both wide and letterbox stay at zero.
If you are adding subtitles to a DVD that had none to begin with, and if you made 2 separate subtitle tracks, perhaps one track for wide screen and another for letterbox (Track 1: W20 LB21), then leave wide set to zero and set letterbox to one.
If you are adding subtitles to a DVD that already has subtitles, then use the next available numbers for wide screen and letterbox. Note: a 4:3 DVD has one subtitle track but a 16:9 DVD must have two subtitle tracks, even if they are both the same.
Once you've made those settings, click the OK button. On the main screen, find and click the Stream attributes button (looks like a green film reel icon). You will get a pop up with a message about fixing the number of subtitle streams. Click Yes. You can set the language and type of subtitle on the next screen, and then exit back to the main screen again.
Find the video segment with the new subtitles and double click it. This time you should see the new subtitle track you added. Save the DVD using the Save item under the File menu. Try to play the DVD and verify that the new subtitles are working.
Step 9: Burn the DVD
Use your favorite DVD burning software, like Nero Burning Rom or ImgBurn, and burn the new VIDEO_TS with .
FAQ / Troubleshooting
General troubleshooting steps you can try if things aren't working right:
(1) Make sure the SUP file you made in step 3 is good. Open it in SubtitleCreator using the Manipulate SUP menu item under the Toole menu, and check if you can see the dialog, and whether the timings look correct. You can use SubtitleWorkshop which may be able to fix any errors. Open the SRT file with SubtitleWorkshop and type CTRL+I. Then click Fix Errors, and then save the file again.
(2) Check the muxman.log after step 4 or step 6 to make sure subtitles were muxed in. You can find the log file in the root of the C drive. It may contain error messages or other information to help you figure out what isn't working.
(3) When using Muxman in step 6 for a 16:9 DVD, be sure to load each SUP file twice. Open the first SUP file and click on Wide followed by LB. Then open the 2nd SUP file and click on Wide followed by LB.
(3) Using VobBlanker, compare your ripped DVD in VobBlanker with the new DVD. Check to see where any cells are different.
(4) Using PGCEdit, run a trace on the ripped DVD and the new DVD. If you see that the last cell is being played first, you can edit the commands to make it play where it's supposed to.
(5) Using PGCEdit, open the new DVD that was produced with VobBlanker. Highlight the movie. Use the "Replace VTST Titles" menu item under the Files menu, and follow the instructions. You will need to select the Muxman muxed movie. You should click Yes for the first question. It is a good idea to let PGCEdit make a backup of the current VOBs as well. When PGCEdit finished, the DVD should play correctly.
Q: If I skip the optional Step 7 (using VobBlanker to retain menus), can I skip step 8?
A: Yes. Step 8 is only necessary if you do step 7.
Q: I ran PgcEdit on the output folder from Muxman. It shows that it has a Sub-picture stream 0 with Wide(1) and Letterbox(0). When I play that DVD, I still see no subtitles, my player's Subtitle menu option is disabled.
A: Open all of the DVD VOB files in DVDSubEdit. The SubPic/Transparency slider should be all the way to the left, to "Clear". If you still can't see the sibtitles, try moving the SubPic Vertical Position slider to try and bring them into view.
Q: My subtitles are all black. If I click the "Use prefered subtitles" my subtitles turn pink, yellow and black.
A: Use DVDSubEdit to open all the VOBs from the new DVD and change the colors.
Q: My subtitles are fine when I test the DVD using my software player. But after I burn the DVD, the subtitles turn green.
A: Either use DVDSubEdit to open the VOBs, or use PGCEdit to open the new DVD. Check the Color Look Up Table (CLUT) which will probably be set to the color you are seeing. You can edit the CLUT in either program.
Q: How can I remove the FBI Anti-Piracy screen from the DVD?
A: You can force the screen to be skipped by using PGCEdit to open the DVD, find the FBI screen, and then using the "Kill PGC Playback" menu item.
Q: How can I synchronize DVD subtitles with a SUP file before adding it to the DVD?
A: Use SubtitleCreator to apply a delay to the SUP file. Open the SUP file, find the Delay menu item, set the delay you need, then save the SUP file. DVDSubEdit will let you do a similar delay to the VOBs themselves.
Q: What is the best way to check subtitles on a ripped DVD?
A: Play the DVD and checking the subtitle languages in PowerDVD another software player. Or use PGCEdit follow along step 8 above to view the subtitle tracks.
Q: How can I check the region of the DVD?
A: Use PGCEdit to openthe DVD, then click the Globe button in the top menu to list the region coding of the DVD.
Q: How can I add a sutitle button to the menu page?
A: This is not easy and requires editing more than just subtitles, but the general approach is: edit the menu to add in the new sub text; edit the underlying subpic to add the new sub text; add a new button;add a new menu command that defines what happens when the new menu button is clicked.
Q: How can I strip subtitles from an AVI and replace those with subtitles in a different language?
A: You cannot strip subtitles if they have been encoded onto the video itself. You can check your AVI with a tool like VirtualDub. When you open the AVI in such a tool, if you see subtitles, then they are part of the video itself and cannot be (easily) removed.
Q: I still can't see any subtitles.
A: Subtitles may not appear by default when playing the DVD - you may have to turn them on in your software player's setup menu or options. If all else fails, try burning the DVD and testing it in a real stand alone player.
Q: How can I change the button of a menu?
A: You must edit the underlying subpic. Use DVDSubEdit. PGCEdit will also allow you to adjust the button outlines.
Source
Saturday, July 16, 2011
YM 11 Smiles/Emoticons
 | o|:-) | tangkap |
 | ~^o^~ | beri semangat |
 | '+_+ | dingin |
 | []--- | memasak |
 | '@^@||| | pusing |
 | %*-{ | kurang beruntung |
 | ^O^||3 | makan |
 | []==[] | nge-gym |
 |  fight) fight) | bertarung |
 | &[] | kado |
 | :-(||> | menyerah |
 | :-)/\:-) | toss |
 | :::^^::: | panas |
 | o|^_^|o | musik |
 | game) | main game |
 |  uke! uke! | muntah |
 | '@-@ | kaca pembesar |
 | o|\~ | bernyanyi |
 | :->~~ | seram |
 | ?@_@? | belajar |
 | tv) | nonton TV |
 | %||:-{ | sial |
Subscribe to:
Comments (Atom)