KHUSUS WINDOWS XP(klo win 7 ato vista, coba aja, ok) Hapus bandwidth
reserved windows untuk meningkatkan kecepatan Internet..
Spoiler for Begini caranya gan:
Langkah - langkah:
1. Klik Start - Run kemudian ketik gpedit.msc
2. Secara default anda akan dihadapkan pada group policy editor
3. Kemudian masuk ke Local Computer Policy
4. Computer Configuration lalu pilih Administrative Templates - Network
- QOS Packet Scheduler - Limit Reservable Bandwidth
5. Pada limit reservable bandwidth klik 2 kali dan pilih enable, dan
pada Bandwidth Limit % masukan angka 0 ( Kosong).
6. Close gpedit dan restart komputer anda. Selesai.. !!
Sunday, July 31, 2011
Monday, July 25, 2011
Easy Way To Leach RapidShare Link
Bagi gua, dan mungkin banyak para download freak, selalu ogah-ogahan buat donlot file dari rapidshare, apa lagi kalo filenya segede gajah, males banget. Udah donlot ratenya kecil banget, bencana putus ditengah jalan kerap terjadi, yg memperparah bencana tadi, gak bisa diresume pula. beeh, jadi males donlot file dari rapid.
Biar males, tapi sebenernya niat dari dalam ati gede banget buat nyari cara donlot file dari link rapidshare, coz banyak banget file bagus yg diupload dirapidshare. Gua mulai dari nyoba-nyoba ngeleech pake situs-situs rapidleech yg bertebaran. Tapi kadang ngeselin juga ngeleech pake situs-situs leecher, rada susah, selama ini sih yg rada gak ribet tuh pake rapid8 ,
but, baru-baru nie gua punya alternatif laen buat ngeleech link dari rapid. Hanya saja nie bukan semacam situs leecher gitu, tapi web server upload file yg punya tambahan fitur buat ngeleech url dari RapidShare... thanks god, doaku selama ini telah Engkau dengarkan...hahahaha
Nah, kali ini gua coba berbagi info, gimana caranya buat kalian ngeleech file, trus lo bisa donlot deh....
Step 1
Langkah pertama, yg jelas, kompie lo musti konek ke internet, hehe....
setelah langkah penting diatas, lo musti daftar dulu ke websitenya, gratis kok. Daftarnya DISINI.
 Daftar Gratis
Step 2
Setelah lo daftar secara gratis. Untuk ngeleech Rapidshare, lo harus login dulu pastinya. Fitur Leech Rapidshare, termasuk pada Fitur Upload File, jadi lo pilih Upload Files. kemudian pilih opsi "Free RapidShare Leech". Masukkan link rapidshare yg udah lama lo simpan, moga aja linknya gak mokat, hehehe
Setelah lo daftar secara gratis. Untuk ngeleech Rapidshare, lo harus login dulu pastinya. Fitur Leech Rapidshare, termasuk pada Fitur Upload File, jadi lo pilih Upload Files. kemudian pilih opsi "Free RapidShare Leech". Masukkan link rapidshare yg udah lama lo simpan, moga aja linknya gak mokat, hehehe
 Mulailah Leeching RapidShare Link
 Leechingnya cepet gila.
Step 3
Jika proses Leeching dari enterupload berhasil maka akan tampil hasil seperti gambar dibawah ini. Ada beberapa opsi link utk beberapa penggunaan, kaya url forum, direct link, ma link buat hapus. Buat donlot lo bisa ngeliat di-my files, trus pilih file yg mo lo donlot, ato pilih direct link saat proses baru aja selesai.
 Beberapa opsi Link File yg baru diupload
Step 4
Saat lo berada pada page direct link dari file yg lo pilih, maka akan muncul page seperti gambar berikut. Seperti biasanya, sebagai anggota perkumpulan orang tanpa modal, lo musti milih opsi yg Free Download. Setelah lo pilih yg Free Download, secara otomatis akan muncul page utk Create Download Link, setelah 30 detik, maka akan segera muncul tombol utk Create Download Linknya, dan jika lo masukin captcha dengan benar, maka server segera mengcreate download linknya.
 Pilih Opsi yg Free Download
 Create Download Link
Step 5
The Final Step, setelah lo klik tombol Create Download Link, segera muncul direct link, yg unik yg hanya utk IP lo, masa idup tuh link cuman 24 jam, coz kalo sampe 2x24 jam, musti lapor RT setempat, hehehe.... Utk masalah kecepatan donlotannya, gua rasa hampir mirip kayak MediaFire, hanya saja ada waktu mokatnya. Tapi kalo beruntung lo bisa cepet banget kok, sebenernya sangat bergantung ma kecepata ISP lo. But, its fine, now we can download rapidshare link. mang kalo gratisan, musti sabar, hehehe...
 Its Download Time...
NB: Max upload dari link rapid 20 link per 24 jam
Friday, July 22, 2011
Download....
Sebelum download, cek dulu link2 yang akan didownload dengan link-checker :
http://wgtools.com/link-checker/
Join File2 hasil download dengan ini :
HJSplit (untuk file ber-extensi .001 .002 .003 dst)
http://www.mediafire.com/?j5mzhnkl3od
ALZip (untuk file ber-extensi .a01 .a02 .alz dst)
http://www.mediafire.com/?jyhzit3jzxt
7Zip (untuk file ber-extensi .rar)
http://www.mediafire.com/?gt02oymftow
Jika menemukan file .rar yang berpassword dan passwordnya tidak tersedia di sini, maka gunakanlah ini:
http://www.mediafire.com/?aoyb1zdingi
Tuesday, July 19, 2011
How to Add New Subtitles to an Existing DVD 2
If you want to add another subtitle language to your DVD, and you don’t mind loosing the menu, here is a guide to help you do it, using only freeware tools.
What do you need (see [url=http://www.doom9.org[/url] or ):
• DVDshrink (release 3.1 or later), to compress the DVD, and create a backup on your hard disk.
• Subtitle workshop (optional), to convert subtitles to SubRip *.srt or *.sub format.
• SubtitleCreator (needs .NET or WinXP SP2) to convert *.srt or *.sub files to *.sup subtitles streams
• VobEdit, to demux DVD *.vob files to separate movie, audio and subtitle streams
• IfoEdit, to put video, audio, and subtitles back together again
• Alternatively, in case you have NTSC movies instead of PAL, use ReJig instead of VobEdit and IfoEdit, as there have been many problems reported with IfoEdit+NTSC.
• DVD burning software
• At least 9Gb available on your hard disk.
The main steps are explained below:
1) Rip the DVD to the hard disk
2) Demultiplex DVD using VobEdit to separate audio, video and subtitle streams
3) [Optional] Convert subtitles to *.srt or *.sub
4) Convert and synchronise subtitles to *.sup (DVD format)
5) Multiplex DVD using IfoEdit of ReJig to a full DVD again
6) Test & burn
1. Copy the original DVD to your hard disk using DVD Shrink (see Figure 1).
a) Open disc (top left)
b) Enter re-author mode (top middle): Drag everything that you want to keep, excluding the menus, from the right DVD browser window to the left window. Here, only the main movie is preserved. But, alternatively, you can also copy the extras to your re-authored DVD, and they will be included as additional chapters at the end of your movie.
Although DVD Shrink is very good in keeping the menus, after adding the subtitles they won’t work anymore unless you go through some very elaborate steps. The reason for this is that the corresponding IFO file, generated at the end of the process described here, doesn’t know anything about the menu structure. There are two elaborate solutions that I didn’t try myself, that you might want to look into if you are really keen on preserving everything. The first is by searching for IfoUpdate, the other is by doing everything
manually.
c) Select the compression tab, and deselect any audio and subtitles that you don’t need – deselect the audio because they cost a lot of space, deselect the subtitles so you don’t have to include them anymore later on.
d) As you see, I've only selected the main movie, although you might add some additional deleted scenes...
e) Press backup DVD (top menu) and select where you want the output to go. Although DVD shrink includes an interface with Nero, allowing it to directly write your stuff to a DVD, you would be better to deselect this option in the preferences, as we still need to add our new subtitle. Additionally, if you have to compress a lot (say to less than 80%), it is good to set the deep analysis mode (tab ‘Backup options’), leading to a better video quality.

Figure 1. DVDShrink allows you to copy only the selected features to your hard disk. In also automatically computes the optimal compression for you, so the movie will fit on a single-sided DVD.
2. Demultiplex original DVD VOB files using VobEdit or ReJig file mode (see Figure 2)
After DVDshrink has copied everything to the hard disk, you will have a set of IFO (InFOrmation), BUP (BackUP copies of IFO), and VOB (Video OBject) files on your hard disk. The largest IFO contains the movie.
a) Start VobEdit, and open the first *.VOB file, which has the same name as the largest IFO file (2c).
b) Demux the VOB: as you already have selected everything in DVDshrink that you want to keep, you can demux all video (*.m2v), audio (*.ac3), and subtitles (*.sup) to a new location on your HD (4a+b).
NOTE: Sometimes, IfoEdit will complain about “Too many frame drops”. The only remedy is to either remove some of the original subtitle streams and try again or to try with ReJig.
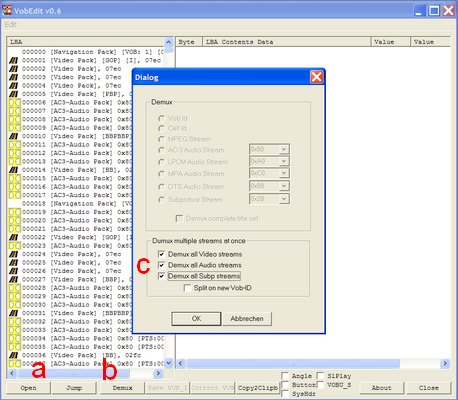
Figure 2. VobEdit allows you to demultiplex (unpack) the VOB files to separate mpeg2 video (*.m2v) files, audio (*.ac3) files, and subtitle (*.sup) files.
3. Convert subtitles to SubRip (*.srt) format using Subtitle workshop (see Figure 3)
Optionally, it sometimes happens that the subtitle files you download from sites such as http://extratitles.to are not in *.srt or *.sub format. In that case, I recommend Subtitle Workshop to convert it to *.srt format. Note the input and output frame rate settings (3a). Knowing the length of my DVD (from the box), I can check the time of the last subtitle to see whether it was in NTSC or PAL (3b) – note that you need to reserve some room for the end titles (actors names etc). Finally, save it as SubRip.

Figure 3. Subtitle Workshop can convert every subtitle format to any other. It also allows you to create new subtitles, but we don't need that feature here.
Further note that I first had some trouble to see special characters correctly (3c+d): I had to use the Central European font in this tool, but I also needed to change my general computer settings (Control panel/Regional settings/Advanced/Non-unicode language/ to Romanian).
4. Convert *.srt or *.sub subtitles to *.sup stream using SubtitleCreator (see Figure 4).
a) Open your downloaded subtitle file (in *.srt or *.sub format). If the source subtitle file consists of multiple parts, you can concatenate them.
b) Open the IFO file of the current DVD (normally VTS_01_0.IFO)
c) Press start to generate your *.sup file
Optionally, you might use:
• The Font Settings tab, to select different colors (Figure 4a)
• The Synchronize tab, to shift time or synchronize with an original *.sup. (Figure 4b)
• The Preview button, to change the position of the subtitle based on the DVD format (Figure 4c)

Figure 4. SubtitleCreator's main window is simple: choose the subtitle and IFO file, and convert it to a *.sup file.

Figure 4a. SubttitleCreator can do fancier stuff though. You can choose the font, font size, and colors (from the IFO palette) to use for the subtitle (default is white letters with a black outline and grey anti-aliasing on a transparent dark grey background).

Figure 4b. Except simple synchronization, like time shifting and frame rate conversion, you can also use an original and therefore synchronized subtitle (*.sup) file, and by selecting similar lines in the original and new subtitle, you can synchronize the new one as well.

Figure 4c. And finally, you can preview the position of the subtitle, also by opening a screenshot from your movie.
(Sorry that I have so many of these, but I wrote this program myself, so I hope you don't mind it too much - BTW, it's open source, so if you don't like it, you can change it...)
Note that the following two steps can also be done using Nik’s freeware tool, ReJig, which has almost identical interfaces, and has better support for NTSC movies: instead of step 4, select ReJig’s file mode, instead of step 5, select ReJig’s DVD Author mode. However, it is slower and produces large temporary files, so I normally prefer IfoEdit and VobEdit.
5. Author new DVD using IfoEdit or ReJig DVD author mode (see Figure 5a+b)
a) Start IfoEdit and open (a) the IFO file of movie (same file as in step 2)
b) Select VTS_PGC_1 (b) and save cell times to file (c) under the tools menu (tells you where a chapter begins) and CLOSE IfoEdit
c) Start IfoEdit again and select menu item DVD Author (e)/Author new DVD (this has to be the first thing that you do in IfoEdit, else this item is not available).
d) Now have a look at Figure 5b: Select the files created by VobEdit: first the *.m2v (a), then all audio files (b), finally all subtitles (c), including the one you created in step 3.
e) Set the corresponding languages of all subtitles (d)
f) Load the cell times (previously saved in step 5b) for the chapters (e). If you use ReJig, you can also load the original IFO file, containing the color palette.
g) Select where you want your output to go (f) and save the new DVD (g) – this one containing your new subtitle!
Note: If you don’t have a lot of free space on your HD, you can now delete the original DVD files used in step 4, as long as you don’t delete the IFO file with the same name.

Figure 5a. IfoEdit (or ReJig) allows you to multiplex (package) your DVD together again. It also allows you to save the celltimes, i.e. the start times expressed as framenumber of your chapters, and to copy the color palette from the original IFO file to the new one created by IfoEdit.

Figure 5b. Select all the files to pack them together again. After IfoEdit has finished (30 minutes), you still need to copy the colors from the original to the new one, save it, and you are finally done!
h) After IfoEdit finishes, you only need to copy the subtitle colors from the original IFO to the new IFO: open the original IFO (see Figure 5a, item(a)), select VTS_PGC_1 (b), and go to the subtitle color menu (d): copy color info. Now, select the new IFO (second file in the top window), go to the same location in this file (b), and paste the color info (d). Save the IFO (e). In case you use ReJig, you don’t have to do this anymore, as you already selected the IFO in step f.
6. Test the output and write to an empty DVD
Using a DVD player (e.g. VideoLAN, WinDVD or VLC media player) that can play from the hard disk, you can already inspect whether the DVD was authored correctly. If you are satisfied, burn the files to a DVD (in the VIDEO_TS folder and enjoy!
Source
What do you need (see [url=http://www.doom9.org[/url] or ):
• DVDshrink (release 3.1 or later), to compress the DVD, and create a backup on your hard disk.
• Subtitle workshop (optional), to convert subtitles to SubRip *.srt or *.sub format.
• SubtitleCreator (needs .NET or WinXP SP2) to convert *.srt or *.sub files to *.sup subtitles streams
• VobEdit, to demux DVD *.vob files to separate movie, audio and subtitle streams
• IfoEdit, to put video, audio, and subtitles back together again
• Alternatively, in case you have NTSC movies instead of PAL, use ReJig instead of VobEdit and IfoEdit, as there have been many problems reported with IfoEdit+NTSC.
• DVD burning software
• At least 9Gb available on your hard disk.
The main steps are explained below:
1) Rip the DVD to the hard disk
2) Demultiplex DVD using VobEdit to separate audio, video and subtitle streams
3) [Optional] Convert subtitles to *.srt or *.sub
4) Convert and synchronise subtitles to *.sup (DVD format)
5) Multiplex DVD using IfoEdit of ReJig to a full DVD again
6) Test & burn
1. Copy the original DVD to your hard disk using DVD Shrink (see Figure 1).
a) Open disc (top left)
b) Enter re-author mode (top middle): Drag everything that you want to keep, excluding the menus, from the right DVD browser window to the left window. Here, only the main movie is preserved. But, alternatively, you can also copy the extras to your re-authored DVD, and they will be included as additional chapters at the end of your movie.
Although DVD Shrink is very good in keeping the menus, after adding the subtitles they won’t work anymore unless you go through some very elaborate steps. The reason for this is that the corresponding IFO file, generated at the end of the process described here, doesn’t know anything about the menu structure. There are two elaborate solutions that I didn’t try myself, that you might want to look into if you are really keen on preserving everything. The first is by searching for IfoUpdate, the other is by doing everything
manually.
c) Select the compression tab, and deselect any audio and subtitles that you don’t need – deselect the audio because they cost a lot of space, deselect the subtitles so you don’t have to include them anymore later on.
d) As you see, I've only selected the main movie, although you might add some additional deleted scenes...
e) Press backup DVD (top menu) and select where you want the output to go. Although DVD shrink includes an interface with Nero, allowing it to directly write your stuff to a DVD, you would be better to deselect this option in the preferences, as we still need to add our new subtitle. Additionally, if you have to compress a lot (say to less than 80%), it is good to set the deep analysis mode (tab ‘Backup options’), leading to a better video quality.
Figure 1. DVDShrink allows you to copy only the selected features to your hard disk. In also automatically computes the optimal compression for you, so the movie will fit on a single-sided DVD.
2. Demultiplex original DVD VOB files using VobEdit or ReJig file mode (see Figure 2)
After DVDshrink has copied everything to the hard disk, you will have a set of IFO (InFOrmation), BUP (BackUP copies of IFO), and VOB (Video OBject) files on your hard disk. The largest IFO contains the movie.
a) Start VobEdit, and open the first *.VOB file, which has the same name as the largest IFO file (2c).
b) Demux the VOB: as you already have selected everything in DVDshrink that you want to keep, you can demux all video (*.m2v), audio (*.ac3), and subtitles (*.sup) to a new location on your HD (4a+b).
NOTE: Sometimes, IfoEdit will complain about “Too many frame drops”. The only remedy is to either remove some of the original subtitle streams and try again or to try with ReJig.
Figure 2. VobEdit allows you to demultiplex (unpack) the VOB files to separate mpeg2 video (*.m2v) files, audio (*.ac3) files, and subtitle (*.sup) files.
3. Convert subtitles to SubRip (*.srt) format using Subtitle workshop (see Figure 3)
Optionally, it sometimes happens that the subtitle files you download from sites such as http://extratitles.to are not in *.srt or *.sub format. In that case, I recommend Subtitle Workshop to convert it to *.srt format. Note the input and output frame rate settings (3a). Knowing the length of my DVD (from the box), I can check the time of the last subtitle to see whether it was in NTSC or PAL (3b) – note that you need to reserve some room for the end titles (actors names etc). Finally, save it as SubRip.
Figure 3. Subtitle Workshop can convert every subtitle format to any other. It also allows you to create new subtitles, but we don't need that feature here.
Further note that I first had some trouble to see special characters correctly (3c+d): I had to use the Central European font in this tool, but I also needed to change my general computer settings (Control panel/Regional settings/Advanced/Non-unicode language/ to Romanian).
4. Convert *.srt or *.sub subtitles to *.sup stream using SubtitleCreator (see Figure 4).
a) Open your downloaded subtitle file (in *.srt or *.sub format). If the source subtitle file consists of multiple parts, you can concatenate them.
b) Open the IFO file of the current DVD (normally VTS_01_0.IFO)
c) Press start to generate your *.sup file
Optionally, you might use:
• The Font Settings tab, to select different colors (Figure 4a)
• The Synchronize tab, to shift time or synchronize with an original *.sup. (Figure 4b)
• The Preview button, to change the position of the subtitle based on the DVD format (Figure 4c)
Figure 4. SubtitleCreator's main window is simple: choose the subtitle and IFO file, and convert it to a *.sup file.
Figure 4a. SubttitleCreator can do fancier stuff though. You can choose the font, font size, and colors (from the IFO palette) to use for the subtitle (default is white letters with a black outline and grey anti-aliasing on a transparent dark grey background).
Figure 4b. Except simple synchronization, like time shifting and frame rate conversion, you can also use an original and therefore synchronized subtitle (*.sup) file, and by selecting similar lines in the original and new subtitle, you can synchronize the new one as well.
Figure 4c. And finally, you can preview the position of the subtitle, also by opening a screenshot from your movie.
(Sorry that I have so many of these, but I wrote this program myself, so I hope you don't mind it too much - BTW, it's open source, so if you don't like it, you can change it...)
Note that the following two steps can also be done using Nik’s freeware tool, ReJig, which has almost identical interfaces, and has better support for NTSC movies: instead of step 4, select ReJig’s file mode, instead of step 5, select ReJig’s DVD Author mode. However, it is slower and produces large temporary files, so I normally prefer IfoEdit and VobEdit.
5. Author new DVD using IfoEdit or ReJig DVD author mode (see Figure 5a+b)
a) Start IfoEdit and open (a) the IFO file of movie (same file as in step 2)
b) Select VTS_PGC_1 (b) and save cell times to file (c) under the tools menu (tells you where a chapter begins) and CLOSE IfoEdit
c) Start IfoEdit again and select menu item DVD Author (e)/Author new DVD (this has to be the first thing that you do in IfoEdit, else this item is not available).
d) Now have a look at Figure 5b: Select the files created by VobEdit: first the *.m2v (a), then all audio files (b), finally all subtitles (c), including the one you created in step 3.
e) Set the corresponding languages of all subtitles (d)
f) Load the cell times (previously saved in step 5b) for the chapters (e). If you use ReJig, you can also load the original IFO file, containing the color palette.
g) Select where you want your output to go (f) and save the new DVD (g) – this one containing your new subtitle!
Note: If you don’t have a lot of free space on your HD, you can now delete the original DVD files used in step 4, as long as you don’t delete the IFO file with the same name.
Figure 5a. IfoEdit (or ReJig) allows you to multiplex (package) your DVD together again. It also allows you to save the celltimes, i.e. the start times expressed as framenumber of your chapters, and to copy the color palette from the original IFO file to the new one created by IfoEdit.
Figure 5b. Select all the files to pack them together again. After IfoEdit has finished (30 minutes), you still need to copy the colors from the original to the new one, save it, and you are finally done!
h) After IfoEdit finishes, you only need to copy the subtitle colors from the original IFO to the new IFO: open the original IFO (see Figure 5a, item(a)), select VTS_PGC_1 (b), and go to the subtitle color menu (d): copy color info. Now, select the new IFO (second file in the top window), go to the same location in this file (b), and paste the color info (d). Save the IFO (e). In case you use ReJig, you don’t have to do this anymore, as you already selected the IFO in step f.
6. Test the output and write to an empty DVD
Using a DVD player (e.g. VideoLAN, WinDVD or VLC media player) that can play from the hard disk, you can already inspect whether the DVD was authored correctly. If you are satisfied, burn the files to a DVD (in the VIDEO_TS folder and enjoy!
Source
How to Add New Subtitles to an Existing DVD 1
1. Convert file film ke bentuk DVD files(ada Video_TS, Audio_TSnya).. convert dlm format 16:9 widescreen
2. Convert Subtitle SRT ke SUP.. Gunakan Subtitle Creator, open SRT dan save menjadi SUP
3. Di menu SubtitleCreator: Tools, DVD Authoring Wizard(CTRL+W)
4. Locate PGCDemux, Muxman, dan VOBBlanker dgn browse ke file tsb
5. Locate DVD(Video_TS.VOB dlm folder Video_TS)
6. Tentukan Output Folder, klik Next
7. Tentukan Language Subtitle, dan browse .SUP nya
8. Start
9. Setelah proses selesai browse ke output folder, coba play video_ts.vob dgn player yg ada, kalo playernya MPC play file video_ts.ifo.. perhatikan subtitle yg apakah sdh benar apa blm jk ada yg kurang buka DVD SUb Edit
10. di DVD Sub Edit, Open VOB files (misal: vts_01_0/1/2/3/dst) open dan edit satu demi satu
11. tentukan subpic selection(language subtitle yg mau diedit)
12. b= background, p=pixel(warna huruf), e1=outline(tebal grs huruf), e2=bayangan
13. pertama di all pixel b=p=white, e1=e2=black
14. lalu setting b,p,e1 dan e2 secara terpisah
15. b-> transparan 0
16. p-> transparan 15
17. e1->transparan 11
18. e2->transparan 0
19. di menu edit: apply last modification to all
20. save all modifications
21. ulangi langkah di atas(No:10-20) utk file kedua dst
22. no vertical border.. slide ke adegan yg subtitlenya 2 baris, lalu geser vertical position hingga baris 2 subtitle berada di atas batas bawah film dan geser sedikit ke atas lagi supaya mata lbh nyaman wkt menonton dan membaca subtitlenya
Jika dgn subtitle creator Background 3-0, Text 3-15, Outline 2-11, Anti-alias 2-0
23. burn ke DVDblank.. di Nero pilih Video Picture, DVD video files, lalu add 2 folder yg telah tersedia yaitu folder Audio_TS dan Video_TS
This is a step by step guide that walks you through two different ways of adding new subtitles to an existing DVD. This can be accomplished without converting the video or audio and without changing the menus.
Step 1: Getting Ready
First, you will want to make sure you have downloaded and installed the following software:
DVDFab Decrypter
SubtitleCreator
PgcDemux
Muxman
VobBlanker
PgcEdit
Step 2: Rip the DVD
If you already have an image of the DVD on your hard drive, you can skip this step.
Use DVDFab Decrypter to rip the DVD.
Step 3: Create the New Subtitle File
SubtitleCreator is a tool that creates, modifies, and converts ASCII-based text files in SRT or SUB format to the binary SUP format expected by many DVD authoring tools. Launch SubtitleCreator. If you have an SRT file with subtitles already (in case you may have downloaded it from a subtitle site), then open that file. If you want to use subtitles from the DVD you have ripped, then open the "VTS_01_0.IFO" file which you should find in the "VIDEO_TS" directory of your ripped DVD. You can also use SubtitleCreator to make a completely new set of subtitles.
Once you have finished creating/editing the subtitles, save them in SUP format (look under the Files menu).
Step 4: Generate the new DVD Files with SubtitleCreator
Start the DVD Authoring Wizard in SubtitleCreator by selecting DVD Authoring under the Tools menu. You will need to provide the location of pgcdemux.exe, muxman.exe and vobblanker.exe files (you should have downloaded and installed these in Step 1 above). Then select the "VIDEO_TS" directory from your ripped DVD, choose an output folder which will hold the new DVD files, and load the SUP file that you created in step 2 above. Then you can click the Start button on the DVD Authoring window.
After processing finishes, you should have a new "VIDEO_TS" folder in the output directory you chose with VOB, IFO and BUP files. Try to play the "VIDEO_TS" folder with a software player like PowerDVD, WinDVD, Media Player Classic (you must open the VIDEO_TS.IFO file with MPC) and try to select the subtitle track. You may need to select the subtitles in the software player menu or on your remote control subtitle button because the DVD menu might not work as expected.


Step 5: Demultiplex the Audio/Video from the Ripped DVD
If the DVD files from step 4 do not seem to play with subtitles correctly, then you can try to accomplish the same thing that SubtitleCreator does but using the tools yourself. First, launch PgcDemux (you should have downloaded and installed this in step 1). For Input IFO, select the "VTS_01_0.IFO" file which you should find in the "VIDEO_TS" directory of your ripped DVD. Pick an output folder. Make sure that "by VOB id" is selected under Mode and that "Titles" is selected under Domain. Check the options "Demux video stream", "Demux all audio streams", "Demux all subpic streams, and "Create CellTimes.txt". Then you can click Process.

Step 6: Generate the new DVD Files with Muxman
Launch Muxman (you should have downloaded and installed this in step 1). For the video input, select the .M2C file that should be in the output folder you chose in step 5. For the video input, select the .AC3 file from that same location. Then, under SubPictures, select the SUP file that you created in step 3. You will need to select a language. Finally, under the File menu, click Import and open the "CellTimes.txt" file which should also be in the output folder from step 5. Once you've set these options, then you can click Start.

Step 7: Restore the Original Menus to the New DVD [OPTIONAL]
Launch VobBlanker. For input, open the "VIDEO_TS.IFO" from the original, ripped DVD. Pick an output folder. In the TitleSet section, select the main movie VOB file - this will usually be the largest file showing up something like "VTS_01_*.VOB". In the section labelled PGCs in Selected TitleSet, click the Replace button, and open the VTS_01_0.IFO file that was created in step 6. Once you've set these options, you can click the Process button.
After processing finishes, you should have a new "VIDEO_TS" folder in the output directory you chose with VOB, IFO and BUP files. Try to play the "VIDEO_TS" folder with a software player like PowerDVD, WinDVD, Media Player Classic (you must open the VIDEO_TS.IFO file with MPC) and try to select the subtitle track. You may need to select the subtitles in the software player menu or on your remote control subtitle button because the DVD menu might not work as expected.
If you you are adding subtitles to a DVD for the first time (the DVD did not already have subtitles), or if you are changing the number of subtitle tracks, then you have to enable the new subtitles. Skip to step 9 to do that.
If you only edited the subtitles without actually changing the number of subtitles tracks, and if your resulting DVD files play with subtitles, then you are finished and you can skip to Step 9.

Step 8: Enable New Subtitles [OPTIONAL]
Launch PGCEdit (you should have downloaded and installed this in step 1). Open the new DVD. Find the video segment with the new subtitles and double click it. Look in the section labelled ""Sub-picture VOB's Decoding Streams" - you should see that either there are no subtitles listed (because you added new subtitles to a DVD without any to begin with) or you may see only the subtitle tracks that were already on the DVD, and none of the new subtitles you added.


Click the first empty stream (the empty streams are labelled 'none'). A new window (Subpic streams setup) will open. In that window, click the Set button. These settings assume you have a 4:3 aspect ratio DVD. If your DVD is 16:9, you may need to examine how any other subtitle tracks are setup and configure the new subtitles accordingly.
If you are adding subtitles to a DVD that had none to begin with, and if you made only one subtitle track in Muxman (Track 1: W20 LB20) then both wide and letterbox stay at zero.
If you are adding subtitles to a DVD that had none to begin with, and if you made 2 separate subtitle tracks, perhaps one track for wide screen and another for letterbox (Track 1: W20 LB21), then leave wide set to zero and set letterbox to one.
If you are adding subtitles to a DVD that already has subtitles, then use the next available numbers for wide screen and letterbox. Note: a 4:3 DVD has one subtitle track but a 16:9 DVD must have two subtitle tracks, even if they are both the same.
Once you've made those settings, click the OK button. On the main screen, find and click the Stream attributes button (looks like a green film reel icon). You will get a pop up with a message about fixing the number of subtitle streams. Click Yes. You can set the language and type of subtitle on the next screen, and then exit back to the main screen again.
Find the video segment with the new subtitles and double click it. This time you should see the new subtitle track you added. Save the DVD using the Save item under the File menu. Try to play the DVD and verify that the new subtitles are working.


Step 9: Burn the DVD
Use your favorite DVD burning software, like Nero Burning Rom or ImgBurn, and burn the new VIDEO_TS with .
General troubleshooting steps you can try if things aren't working right:
(1) Make sure the SUP file you made in step 3 is good. Open it in SubtitleCreator using the Manipulate SUP menu item under the Toole menu, and check if you can see the dialog, and whether the timings look correct. You can use SubtitleWorkshop which may be able to fix any errors. Open the SRT file with SubtitleWorkshop and type CTRL+I. Then click Fix Errors, and then save the file again.
(2) Check the muxman.log after step 4 or step 6 to make sure subtitles were muxed in. You can find the log file in the root of the C drive. It may contain error messages or other information to help you figure out what isn't working.
(3) When using Muxman in step 6 for a 16:9 DVD, be sure to load each SUP file twice. Open the first SUP file and click on Wide followed by LB. Then open the 2nd SUP file and click on Wide followed by LB.
(3) Using VobBlanker, compare your ripped DVD in VobBlanker with the new DVD. Check to see where any cells are different.
(4) Using PGCEdit, run a trace on the ripped DVD and the new DVD. If you see that the last cell is being played first, you can edit the commands to make it play where it's supposed to.
(5) Using PGCEdit, open the new DVD that was produced with VobBlanker. Highlight the movie. Use the "Replace VTST Titles" menu item under the Files menu, and follow the instructions. You will need to select the Muxman muxed movie. You should click Yes for the first question. It is a good idea to let PGCEdit make a backup of the current VOBs as well. When PGCEdit finished, the DVD should play correctly.
Q: If I skip the optional Step 7 (using VobBlanker to retain menus), can I skip step 8?
A: Yes. Step 8 is only necessary if you do step 7.
Q: I ran PgcEdit on the output folder from Muxman. It shows that it has a Sub-picture stream 0 with Wide(1) and Letterbox(0). When I play that DVD, I still see no subtitles, my player's Subtitle menu option is disabled.
A: Open all of the DVD VOB files in DVDSubEdit. The SubPic/Transparency slider should be all the way to the left, to "Clear". If you still can't see the sibtitles, try moving the SubPic Vertical Position slider to try and bring them into view.
Q: My subtitles are all black. If I click the "Use prefered subtitles" my subtitles turn pink, yellow and black.
A: Use DVDSubEdit to open all the VOBs from the new DVD and change the colors.
Q: My subtitles are fine when I test the DVD using my software player. But after I burn the DVD, the subtitles turn green.
A: Either use DVDSubEdit to open the VOBs, or use PGCEdit to open the new DVD. Check the Color Look Up Table (CLUT) which will probably be set to the color you are seeing. You can edit the CLUT in either program.
Q: How can I remove the FBI Anti-Piracy screen from the DVD?
A: You can force the screen to be skipped by using PGCEdit to open the DVD, find the FBI screen, and then using the "Kill PGC Playback" menu item.
Q: How can I synchronize DVD subtitles with a SUP file before adding it to the DVD?
A: Use SubtitleCreator to apply a delay to the SUP file. Open the SUP file, find the Delay menu item, set the delay you need, then save the SUP file. DVDSubEdit will let you do a similar delay to the VOBs themselves.
Q: What is the best way to check subtitles on a ripped DVD?
A: Play the DVD and checking the subtitle languages in PowerDVD another software player. Or use PGCEdit follow along step 8 above to view the subtitle tracks.
Q: How can I check the region of the DVD?
A: Use PGCEdit to openthe DVD, then click the Globe button in the top menu to list the region coding of the DVD.
Q: How can I add a sutitle button to the menu page?
A: This is not easy and requires editing more than just subtitles, but the general approach is: edit the menu to add in the new sub text; edit the underlying subpic to add the new sub text; add a new button;add a new menu command that defines what happens when the new menu button is clicked.
Q: How can I strip subtitles from an AVI and replace those with subtitles in a different language?
A: You cannot strip subtitles if they have been encoded onto the video itself. You can check your AVI with a tool like VirtualDub. When you open the AVI in such a tool, if you see subtitles, then they are part of the video itself and cannot be (easily) removed.
Q: I still can't see any subtitles.
A: Subtitles may not appear by default when playing the DVD - you may have to turn them on in your software player's setup menu or options. If all else fails, try burning the DVD and testing it in a real stand alone player.
Q: How can I change the button of a menu?
A: You must edit the underlying subpic. Use DVDSubEdit. PGCEdit will also allow you to adjust the button outlines.
Source
2. Convert Subtitle SRT ke SUP.. Gunakan Subtitle Creator, open SRT dan save menjadi SUP
3. Di menu SubtitleCreator: Tools, DVD Authoring Wizard(CTRL+W)
4. Locate PGCDemux, Muxman, dan VOBBlanker dgn browse ke file tsb
5. Locate DVD(Video_TS.VOB dlm folder Video_TS)
6. Tentukan Output Folder, klik Next
7. Tentukan Language Subtitle, dan browse .SUP nya
8. Start
9. Setelah proses selesai browse ke output folder, coba play video_ts.vob dgn player yg ada, kalo playernya MPC play file video_ts.ifo.. perhatikan subtitle yg apakah sdh benar apa blm jk ada yg kurang buka DVD SUb Edit
10. di DVD Sub Edit, Open VOB files (misal: vts_01_0/1/2/3/dst) open dan edit satu demi satu
11. tentukan subpic selection(language subtitle yg mau diedit)
12. b= background, p=pixel(warna huruf), e1=outline(tebal grs huruf), e2=bayangan
13. pertama di all pixel b=p=white, e1=e2=black
14. lalu setting b,p,e1 dan e2 secara terpisah
15. b-> transparan 0
16. p-> transparan 15
17. e1->transparan 11
18. e2->transparan 0
19. di menu edit: apply last modification to all
20. save all modifications
21. ulangi langkah di atas(No:10-20) utk file kedua dst
22. no vertical border.. slide ke adegan yg subtitlenya 2 baris, lalu geser vertical position hingga baris 2 subtitle berada di atas batas bawah film dan geser sedikit ke atas lagi supaya mata lbh nyaman wkt menonton dan membaca subtitlenya
Jika dgn subtitle creator Background 3-0, Text 3-15, Outline 2-11, Anti-alias 2-0
23. burn ke DVDblank.. di Nero pilih Video Picture, DVD video files, lalu add 2 folder yg telah tersedia yaitu folder Audio_TS dan Video_TS
This is a step by step guide that walks you through two different ways of adding new subtitles to an existing DVD. This can be accomplished without converting the video or audio and without changing the menus.
Step 1: Getting Ready
First, you will want to make sure you have downloaded and installed the following software:
DVDFab Decrypter
SubtitleCreator
PgcDemux
Muxman
VobBlanker
PgcEdit
Step 2: Rip the DVD
If you already have an image of the DVD on your hard drive, you can skip this step.
Use DVDFab Decrypter to rip the DVD.
Step 3: Create the New Subtitle File
SubtitleCreator is a tool that creates, modifies, and converts ASCII-based text files in SRT or SUB format to the binary SUP format expected by many DVD authoring tools. Launch SubtitleCreator. If you have an SRT file with subtitles already (in case you may have downloaded it from a subtitle site), then open that file. If you want to use subtitles from the DVD you have ripped, then open the "VTS_01_0.IFO" file which you should find in the "VIDEO_TS" directory of your ripped DVD. You can also use SubtitleCreator to make a completely new set of subtitles.
Once you have finished creating/editing the subtitles, save them in SUP format (look under the Files menu).
Step 4: Generate the new DVD Files with SubtitleCreator
Start the DVD Authoring Wizard in SubtitleCreator by selecting DVD Authoring under the Tools menu. You will need to provide the location of pgcdemux.exe, muxman.exe and vobblanker.exe files (you should have downloaded and installed these in Step 1 above). Then select the "VIDEO_TS" directory from your ripped DVD, choose an output folder which will hold the new DVD files, and load the SUP file that you created in step 2 above. Then you can click the Start button on the DVD Authoring window.
After processing finishes, you should have a new "VIDEO_TS" folder in the output directory you chose with VOB, IFO and BUP files. Try to play the "VIDEO_TS" folder with a software player like PowerDVD, WinDVD, Media Player Classic (you must open the VIDEO_TS.IFO file with MPC) and try to select the subtitle track. You may need to select the subtitles in the software player menu or on your remote control subtitle button because the DVD menu might not work as expected.
Step 5: Demultiplex the Audio/Video from the Ripped DVD
If the DVD files from step 4 do not seem to play with subtitles correctly, then you can try to accomplish the same thing that SubtitleCreator does but using the tools yourself. First, launch PgcDemux (you should have downloaded and installed this in step 1). For Input IFO, select the "VTS_01_0.IFO" file which you should find in the "VIDEO_TS" directory of your ripped DVD. Pick an output folder. Make sure that "by VOB id" is selected under Mode and that "Titles" is selected under Domain. Check the options "Demux video stream", "Demux all audio streams", "Demux all subpic streams, and "Create CellTimes.txt". Then you can click Process.
Step 6: Generate the new DVD Files with Muxman
Launch Muxman (you should have downloaded and installed this in step 1). For the video input, select the .M2C file that should be in the output folder you chose in step 5. For the video input, select the .AC3 file from that same location. Then, under SubPictures, select the SUP file that you created in step 3. You will need to select a language. Finally, under the File menu, click Import and open the "CellTimes.txt" file which should also be in the output folder from step 5. Once you've set these options, then you can click Start.
Step 7: Restore the Original Menus to the New DVD [OPTIONAL]
Launch VobBlanker. For input, open the "VIDEO_TS.IFO" from the original, ripped DVD. Pick an output folder. In the TitleSet section, select the main movie VOB file - this will usually be the largest file showing up something like "VTS_01_*.VOB". In the section labelled PGCs in Selected TitleSet, click the Replace button, and open the VTS_01_0.IFO file that was created in step 6. Once you've set these options, you can click the Process button.
After processing finishes, you should have a new "VIDEO_TS" folder in the output directory you chose with VOB, IFO and BUP files. Try to play the "VIDEO_TS" folder with a software player like PowerDVD, WinDVD, Media Player Classic (you must open the VIDEO_TS.IFO file with MPC) and try to select the subtitle track. You may need to select the subtitles in the software player menu or on your remote control subtitle button because the DVD menu might not work as expected.
If you you are adding subtitles to a DVD for the first time (the DVD did not already have subtitles), or if you are changing the number of subtitle tracks, then you have to enable the new subtitles. Skip to step 9 to do that.
If you only edited the subtitles without actually changing the number of subtitles tracks, and if your resulting DVD files play with subtitles, then you are finished and you can skip to Step 9.
Step 8: Enable New Subtitles [OPTIONAL]
Launch PGCEdit (you should have downloaded and installed this in step 1). Open the new DVD. Find the video segment with the new subtitles and double click it. Look in the section labelled ""Sub-picture VOB's Decoding Streams" - you should see that either there are no subtitles listed (because you added new subtitles to a DVD without any to begin with) or you may see only the subtitle tracks that were already on the DVD, and none of the new subtitles you added.
Click the first empty stream (the empty streams are labelled 'none'). A new window (Subpic streams setup) will open. In that window, click the Set button. These settings assume you have a 4:3 aspect ratio DVD. If your DVD is 16:9, you may need to examine how any other subtitle tracks are setup and configure the new subtitles accordingly.
If you are adding subtitles to a DVD that had none to begin with, and if you made only one subtitle track in Muxman (Track 1: W20 LB20) then both wide and letterbox stay at zero.
If you are adding subtitles to a DVD that had none to begin with, and if you made 2 separate subtitle tracks, perhaps one track for wide screen and another for letterbox (Track 1: W20 LB21), then leave wide set to zero and set letterbox to one.
If you are adding subtitles to a DVD that already has subtitles, then use the next available numbers for wide screen and letterbox. Note: a 4:3 DVD has one subtitle track but a 16:9 DVD must have two subtitle tracks, even if they are both the same.
Once you've made those settings, click the OK button. On the main screen, find and click the Stream attributes button (looks like a green film reel icon). You will get a pop up with a message about fixing the number of subtitle streams. Click Yes. You can set the language and type of subtitle on the next screen, and then exit back to the main screen again.
Find the video segment with the new subtitles and double click it. This time you should see the new subtitle track you added. Save the DVD using the Save item under the File menu. Try to play the DVD and verify that the new subtitles are working.
Step 9: Burn the DVD
Use your favorite DVD burning software, like Nero Burning Rom or ImgBurn, and burn the new VIDEO_TS with .
FAQ / Troubleshooting
General troubleshooting steps you can try if things aren't working right:
(1) Make sure the SUP file you made in step 3 is good. Open it in SubtitleCreator using the Manipulate SUP menu item under the Toole menu, and check if you can see the dialog, and whether the timings look correct. You can use SubtitleWorkshop which may be able to fix any errors. Open the SRT file with SubtitleWorkshop and type CTRL+I. Then click Fix Errors, and then save the file again.
(2) Check the muxman.log after step 4 or step 6 to make sure subtitles were muxed in. You can find the log file in the root of the C drive. It may contain error messages or other information to help you figure out what isn't working.
(3) When using Muxman in step 6 for a 16:9 DVD, be sure to load each SUP file twice. Open the first SUP file and click on Wide followed by LB. Then open the 2nd SUP file and click on Wide followed by LB.
(3) Using VobBlanker, compare your ripped DVD in VobBlanker with the new DVD. Check to see where any cells are different.
(4) Using PGCEdit, run a trace on the ripped DVD and the new DVD. If you see that the last cell is being played first, you can edit the commands to make it play where it's supposed to.
(5) Using PGCEdit, open the new DVD that was produced with VobBlanker. Highlight the movie. Use the "Replace VTST Titles" menu item under the Files menu, and follow the instructions. You will need to select the Muxman muxed movie. You should click Yes for the first question. It is a good idea to let PGCEdit make a backup of the current VOBs as well. When PGCEdit finished, the DVD should play correctly.
Q: If I skip the optional Step 7 (using VobBlanker to retain menus), can I skip step 8?
A: Yes. Step 8 is only necessary if you do step 7.
Q: I ran PgcEdit on the output folder from Muxman. It shows that it has a Sub-picture stream 0 with Wide(1) and Letterbox(0). When I play that DVD, I still see no subtitles, my player's Subtitle menu option is disabled.
A: Open all of the DVD VOB files in DVDSubEdit. The SubPic/Transparency slider should be all the way to the left, to "Clear". If you still can't see the sibtitles, try moving the SubPic Vertical Position slider to try and bring them into view.
Q: My subtitles are all black. If I click the "Use prefered subtitles" my subtitles turn pink, yellow and black.
A: Use DVDSubEdit to open all the VOBs from the new DVD and change the colors.
Q: My subtitles are fine when I test the DVD using my software player. But after I burn the DVD, the subtitles turn green.
A: Either use DVDSubEdit to open the VOBs, or use PGCEdit to open the new DVD. Check the Color Look Up Table (CLUT) which will probably be set to the color you are seeing. You can edit the CLUT in either program.
Q: How can I remove the FBI Anti-Piracy screen from the DVD?
A: You can force the screen to be skipped by using PGCEdit to open the DVD, find the FBI screen, and then using the "Kill PGC Playback" menu item.
Q: How can I synchronize DVD subtitles with a SUP file before adding it to the DVD?
A: Use SubtitleCreator to apply a delay to the SUP file. Open the SUP file, find the Delay menu item, set the delay you need, then save the SUP file. DVDSubEdit will let you do a similar delay to the VOBs themselves.
Q: What is the best way to check subtitles on a ripped DVD?
A: Play the DVD and checking the subtitle languages in PowerDVD another software player. Or use PGCEdit follow along step 8 above to view the subtitle tracks.
Q: How can I check the region of the DVD?
A: Use PGCEdit to openthe DVD, then click the Globe button in the top menu to list the region coding of the DVD.
Q: How can I add a sutitle button to the menu page?
A: This is not easy and requires editing more than just subtitles, but the general approach is: edit the menu to add in the new sub text; edit the underlying subpic to add the new sub text; add a new button;add a new menu command that defines what happens when the new menu button is clicked.
Q: How can I strip subtitles from an AVI and replace those with subtitles in a different language?
A: You cannot strip subtitles if they have been encoded onto the video itself. You can check your AVI with a tool like VirtualDub. When you open the AVI in such a tool, if you see subtitles, then they are part of the video itself and cannot be (easily) removed.
Q: I still can't see any subtitles.
A: Subtitles may not appear by default when playing the DVD - you may have to turn them on in your software player's setup menu or options. If all else fails, try burning the DVD and testing it in a real stand alone player.
Q: How can I change the button of a menu?
A: You must edit the underlying subpic. Use DVDSubEdit. PGCEdit will also allow you to adjust the button outlines.
Source
Saturday, July 16, 2011
YM 11 Smiles/Emoticons
 | o|:-) | tangkap |
 | ~^o^~ | beri semangat |
 | '+_+ | dingin |
 | []--- | memasak |
 | '@^@||| | pusing |
 | %*-{ | kurang beruntung |
 | ^O^||3 | makan |
 | []==[] | nge-gym |
 |  fight) fight) | bertarung |
 | &[] | kado |
 | :-(||> | menyerah |
 | :-)/\:-) | toss |
 | :::^^::: | panas |
 | o|^_^|o | musik |
 | game) | main game |
 |  uke! uke! | muntah |
 | '@-@ | kaca pembesar |
 | o|\~ | bernyanyi |
 | :->~~ | seram |
 | ?@_@? | belajar |
 | tv) | nonton TV |
 | %||:-{ | sial |
Subscribe to:
Comments (Atom)